

Congratulations on your purchase of a Lupit Pole
the best known and most widespread international brand, especially in Europe, in the manufacture of equipment conforming to sports and competitive training specifically for pole dancing and aeiral dance. Home, sports, competitions, schools. Since the birth of Pole and Aeiral dance sports in the rest of the world , Lupit Pole, with its presence, has contributed to the diffusion and recognition of these sports. Even before they arrived in Italy, Lupit Pole was already a brand specialising in the sector, custom-made pole dance equipment, as well as the best design for home fitness training with multi-piece adjustable poles. 100% EU made, CE and IPSF standards, warranty and service.
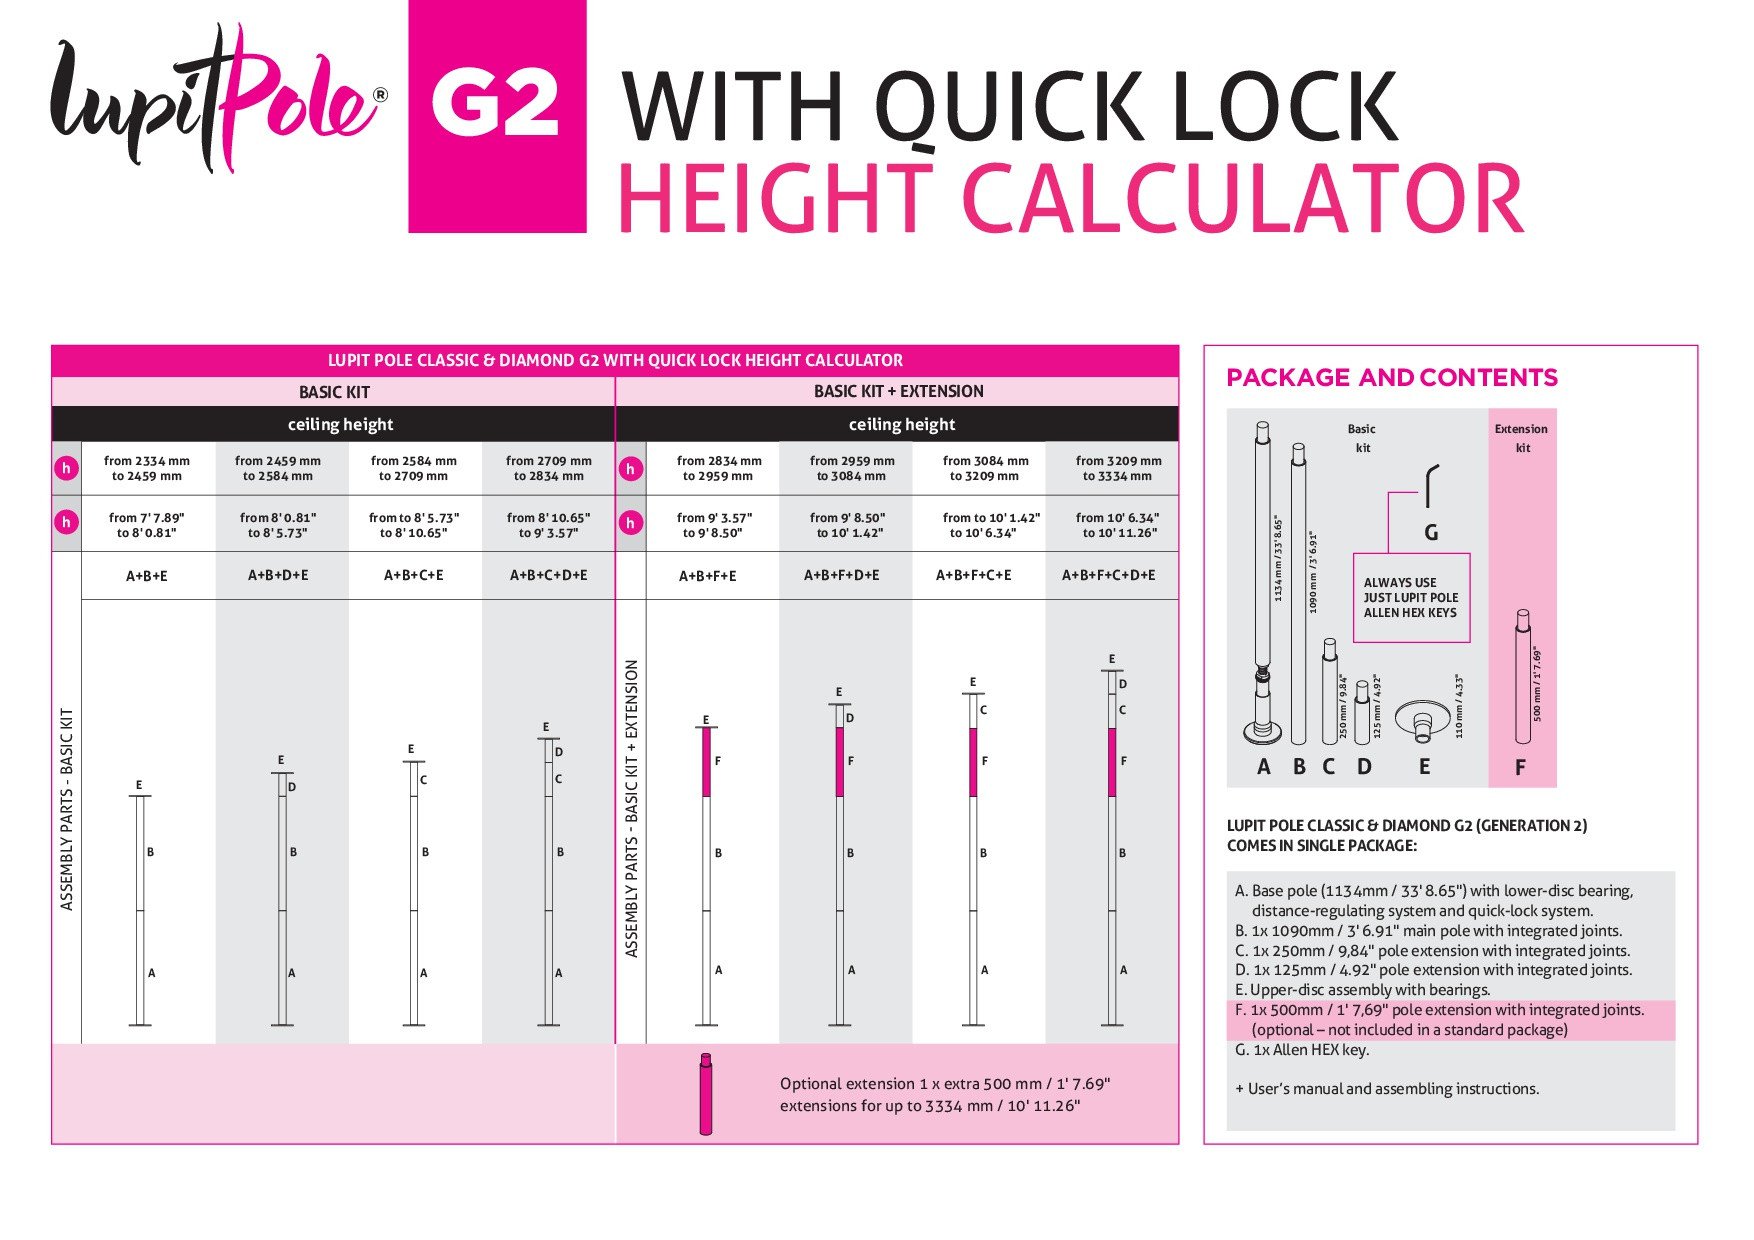
Assembling Lupit G2 pole dance poles
* Note the assembly of Lupit Pole poles is very quick and easy
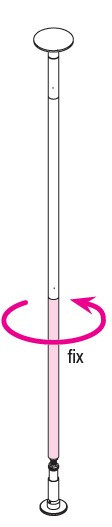
Once you have assembled the pole, proceed to raise it vertically, put it in static rotation, and proceed to stretch it against the ceiling. Once positioned, tighten 4 screws of the Safe Thread lock (pole height lock), and you are ready to practice for hours on end. When you're done, you can shorten it and put it away.The Home G2 Lupit pole covers all heights from 2.3 to 3.3 metres, you adjust it.
Here you will find every single step for assembly :D
Link to lupit g2 new generation spinning and static poles.
Preamble :if the recipient is not skilled in assembling or handling tools, we recommend that you contact us and do it with us, or have someone who can take measurements, use a spanner and follow the instructions for you :) If you need advice, no need to go it alone you can count on our assistance, contact the pole dance experts! Call us or use Whats APP.
Forpole dance training it is advisable to choose equipment made by a CE and IPSF certified and pole sports compliant company .
Lupit Pole meets the highest CE and IPSF standards for the manufacture of pole sports and fitness equipment. safety and quality standards dictated by the European Union, specifically Standard EN 957-1 Stationary training equipment. 
The CE and IPSF Marking
According to European Parliament and Council Decision No. 768/2008/EC, the CE marking in this sector "is the visible consequence of a whole process of technical sports assessment pole dance fitness, the conformity of the sports equipment and its safety".
more information: links
The Lupit New generation G2 poles come with:
'instruction manual' in English with clear figures and explanations from maintenance to correct use, 'qr code' to reach the video assembly, subtitles in all languages, stamped and signed 'guarantee and test certificate'.
Furthermore, we at Italiapoledanceshop, Italian suppliers, produce this guide in even more detail, and are available to answer any questions you may have regarding operation, assembly, advice, spare parts, before, during and after purchase.
QUICK MENU :
- Features
- Indications for choosing the standard or quick lock model
- MOUNTING VIDEO
- ASSEMBLY FROM A TO Z pole dance Lupit G2
- Maintenance
- Correct assembly test
- Lupit pole dance polematerials
- Heighttables (also in the package)
- Guarantees
- Adding holes - or not?
- How to use Allen screws?
Lupit pole dance pole New Generation - G2
Quick lock or Standard pressure lock
All existing pole dance polesare defined as ' pressure' (or would be non-removable) poles , only poles that do not remove and are fixed to the floor and ceiling, do not require the pole extension system hence the name ' pressure '.
Information link on the maximum safety of Lupit g2 pressure poles.
note the Lupit Pole poles do not require any additional options to secure the pole, such as 'safety plates' or other...
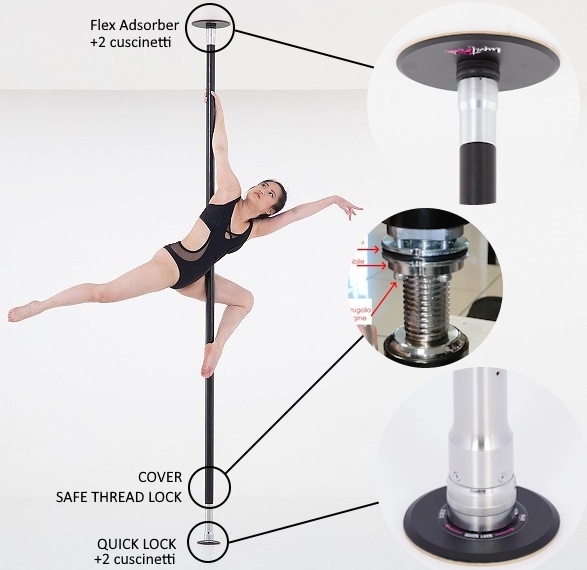
They integrate the NEW Safety Block Nut from 2023 , designed for maximum safety, it prevents the pole from sagging once the extension phase between floor and ceiling is complete.
The Lupit G2 New Generation can be used for continuous pole dance training anywhere,they are designed to be assembled independently,
one pole covers all heights from 2.3 to 3.3 metres,
simply follow the instructions for safe and quick assembly.
*Do not take initiative, or dismantle things that should not be dismantled
The Lupit G2 pole can be fitted with 4 holes on the upper disc, this does not affect the removability of the pole, which always remains removable
As with any existing push-pull pole, before training :
1
Extendthe pole to squeeze it tightly between the floor and the ceiling; making sure it is perfectly vertical; stretch it just far enough so that when you pull it or climb on it it does not move
2
LOCK the extension system, inside the Cover (4 screws to be tightened)
The pole is now ready for practice.
An additional test
you need to check that you have done it right. always useful, it is performed by putting the pole in static, and trying to turn it on itself as if to lengthen or shorten it, with force. If it does not lengthen or shorten , the assembly is correct.
Again, this is a test you must do on any brand of pressure pole.
CONGRATULATIONS ON YOUR PURCHASE
You are about to assemble the best pole dance pole for training anywhere. With professional assistance from the Lupit technical staff and italiapoledanceshop.
the Lupit G2 pole is unique in terms of quality, design and safety, with a guarantee and service that results in maximum satisfaction for customers who use it to train with confidence.
The pole is removable, and is modular, the parts joined differently according to height, allowing you to reach them all up to 3.3 metres (with 500 extension). Once installed, the pressure compresses the various pieces, which become one, stable pole.
The slight bending is necessary for correct distribution between the joints of the forces impressed on the entire structure, and to maintain the pole's eternal durability and aesthetic beauty.
The only pole dance pole that can be easily installed/removed in minutes by one person independently and without drilling holes in the ceiling. No constraints on a specific height, as with custom-made poles, ( Lupit PRO G4 )
Upper and lower disc in contact with floor and ceiling: orange non-slip'grip' rubber
Designed to give maximum results from your workout is free of holes and gaps from top to bottom, is skin-friendly and offers a non-allergenic grip
FEATURES OF Pole dance poles FOR TRAINING AT HOME OR OUT OF SCHOOL
The Lupit Classic new generation 2 G2 pole, like ALL serious professional poles for pole dance training, are guaranteed with a test certificate inside the package, stamped and signed. on the guarantee all specifications
The Lupit G2 Classic poles can also be requested with holes for fixing to the ceiling, this is an option at the discretion of the customer, which is not necessary for greater safety, but those who do not mind having to drill holes in the ceiling can also adopt this choice.
Lupit G2 Home pole dance poles are made by a historic 100% European production company, which specialises in the construction of top level pole dance and aerial sports equipment.
For as long as the sport of pole dancing has existed in the world, i.e. before it came to Italy, Lupit Pole was already present with its poles on the stages of internationalcompetitions, ( CHAMPION model fixed above and below), in the best schools in Europe ( Lupit PRO G4 poles made to measure, removable in 5 seconds with ceiling attachment and IPSF) and for training outside the school ( Lupit G2 can be used anywhere without drilling).
Pole dance poles of this type should be purchased from the official supplier in your area, for excellent assistance, Italiapoledanceshop follows you to give you the guarantee of maximum satisfaction
designed to have the highest safety standards combined with the best patents. The pole materials are all completely nickel-free 100% hypoallergenic.
( if you have a sloping ceiling add the SLOPE to be fixed with 4 holes on sloping ceilings up to 90° )
in the Lupit g2 Home pole package you will find everything you need for assembly.
2.34 to 3.34 m ( quick lock version )
2.3 to 3.3 ( standard lock, allen key )
BELOW THE INSTRUCTIONS ATTACHED TO THE POLE with instructions on what to do and what not to do:
Unlike the custom-made, single- or double-piece pole (the Lupit Pro G4 ), the Lupit G2 pole flexes just enough to release the tension of the structure and make it safe. So the difference between a SINGLE-PIECE pole up to 4.2 metres and the multi-piece pole that you can use at any height is the slight and soft bending, as well as the price, which for custom-made poles is much higher.
At the end of this assembly tutorial you will also find the list of pole dance champions around the world who have tried, tested and become spokesmen for the quality of the Lupit pole g2.
VIDEO assembly of the Lupit pole G2
The assembly video provided by the factory, is available on you tube and Vimeo, and below.
Keo Kenneth the multi-award winning pole dance champion, explains directly how to assemble the pole, you can insert subtitles in Italian.
we recommend Italian subtitles
- press'encoded subtitles' it's a cartoon icon with text
- then press on the settings wheel....just to the right of it
- select ' SUBTITLES
- Now 3 items appear, DEACTIVATED, ENGLISH or AUTOMATIC TRANSLATION,
- click on the last item and choose ITALIAN...
At the link below, you will jump straight to the part of the video where it is explained how to set up the inner block part, how to test the correct mounting of the pole and other evaluations on the g2 model by the multi-champion poler KAO:
https://youtu.be/TqojO7y4DFA?t=1313
Another video of mounting the pole without height-adjustable ceiling attachment.
Official Lupit Pole assembly instructions
Lupit Pole Materials
Chrome:
the chrome version is manufactured using a state-of-the-art process that is totally nickel-free and 100% hypoallergenic. It is suitable for every level of sports training. The smooth, shiny surface can be cleaned with pure alcohol and a clean soft dry cloth. At a constant temperature in a non-humid environment, the pole once cleaned with alcohol has a perfectly stable grip, while at the same time easily allowing for all shifts and figures in controlled movement, being smooth, without that friction that strips the epidermis, a 100% skin-friendly surface
Stainless Steel:
the Inox steel of the Lupit pole G2 is the same as the Champion lupits used in international IPSF competitions, suitable for professionals but also for those with just a few months' experience, it allows you to train on a surface with a perfectly balanced grip, hypoallergenic, matt silver in colour. Highly scratch-resistant and easy to clean, it is a surface that will remain beautiful forever. Cleaning Pure alcohol and soft cloth
Black Powder :
The black or other colour coating of the Lupit pole g2 Home is made using a long, state-of-the-art process. It is ideal for beginners as well as for experts. The matt and smooth surface gives you a stable grip, greater than chrome, and like chrome it allows you to perform any position and movement in controlled gliding without stripping, precisely because the surface is smooth. The 'paint' is a thick and safe coating of the pole.
Cleaning: use pure alcohol, or mild detergents, or simply 1 soft sponge wrung out with mild soap and water ( on the painted part ) and dry well with a soft clean cloth.
Indications for choosing a model
to make the pole rotatable or static you act on a 'mechanism' which can be of 2 types.
STANDARD (Allen)
At the base of the pole there is a hole with a hexagonal grub screw in it. Using an Allen key, tighten the screw to make the pole static and unscrew it to make the pole swivel.
QUICK LOCK (quick change)
This is the quick-change system for changing from swivel to static and the most ingenious patented system as it does not interrupt the continuity of the pole, making it possible to make even low grips.
At the bottom of the pole there is a ring nut with 2 spherical buttons. To change from static to spin, simply press the 2 buttons together and turn the ring nut to the right or left as indicated on the pole. The change from spin to static is done in 1 second and without the use of keys or screws.
Any standard pole can be upgraded to the QUICK LOCK version with the appropriate spare part.
Here is a video on how to mount the quick lock on a Standard pole.
These are the 2 versions of the removable height-adjustable Lupit G2 pole.
There is a further variant which is the DIAMOND with embellishment of the upper and lower base with Swarovski crystals all around.
ASSEMBLY FROM A TO Z pole dance Lupit G2
let's start assembling the lupit g2 pole 2023\2024
- Open the box
When you open the pole box :
You will be impressed by the perfect packaging, each piece has its own specific corrugated cardboard box that wraps it, and each pole is placed in its turn in a thick transparent bag to avoid contact with any surface during transport, packed so that nothing can move, perfectly.
Externally the packaging is tightened with white 'straps' that make transport safe.
The external dimensions are small.
| Length | 122 cm |
| width | 23 cm |
| height | 14 cm |
| weight | 17.5 kg |
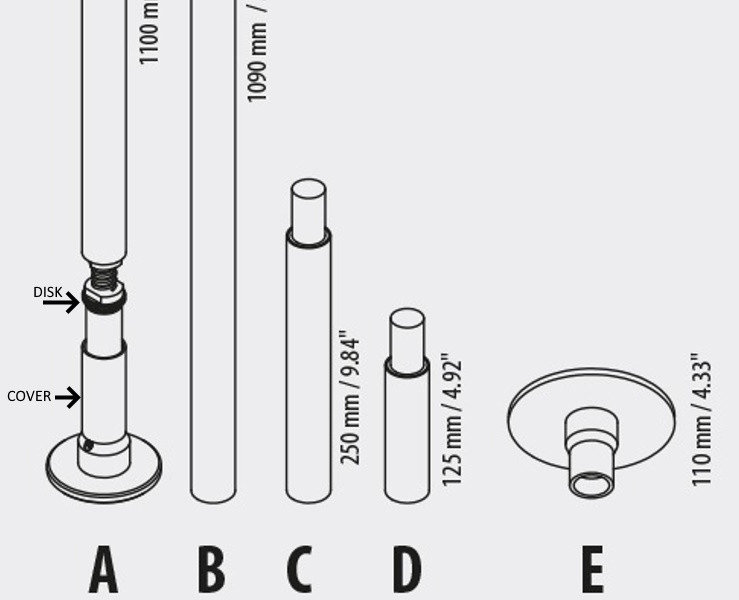
- The contents of the package in the standard version
-the pole pieces you will find inside the package as shown below are :
- 1 pole A 1100mm, (consisting of: ground disc, which you do not have to dismantle, the pole with internal thread, the cover, the 2 stationary discs and the pole that screws onto the internal thread)
- 1 B-pole 1090mm one-piece ,
- 2 already joined extensions C 250mm + D 125mm (which can be split if required)
- optionally 1 extension 500mm
- 1 upper circular base E
- and 1 lower one already attached to pole A
- 1 guarantee and quality control certificate with stamp and date.
- 1 manual with instructions and height tables showing the sequence in which the parts are to be assembled....
- 2 hexadecimal 'L' keys which are needed in the standard model. only 1 if you have the Quick Lock model
each piece is identified by a letter on the casing and below in the identification table:
Take all parts out of the box and identify them.
Open the instruction table, and check how to configure the pole on the height page (below)
1 measure the height between the floor and ceiling to 2 decimal places ( 2.78m ) , 2 check the table at the height measured, the drawing of the pole assembly sequence.
You only need to know the floor-to-ceiling measurement of the room at the point where you want to use the pole...
Take the measurement with a laser metre or one that is accurate to 2 decimal places.
As you can see below, each height range corresponds to a pole design, e.g. from 2.33 to 2.45 corresponds to the first figure, if your measurement was 2.4 metres then you should configure the pole as in the first figure, joining in sequence the pieces indicated A+B
NOTE: The disks inside the COVER of the NUT system 2, arrive already with the screws inserted and screwed in, just pointed, so if you find yourself without enough space to be able to insert the L-shaped key, just put the pole in static, turn it anti-clockwise and it will lengthen, increasing the space between the screws and the lower part of the pole.
You do not have to remove these 4 screws, only loosen them to lengthen the pole or tighten them to use the pole.
1 Assembly
- Take pole 'A' first, the one with the small circular lower base, which touches the floor...
put the pole in static according to the model,
if you have the standard type:
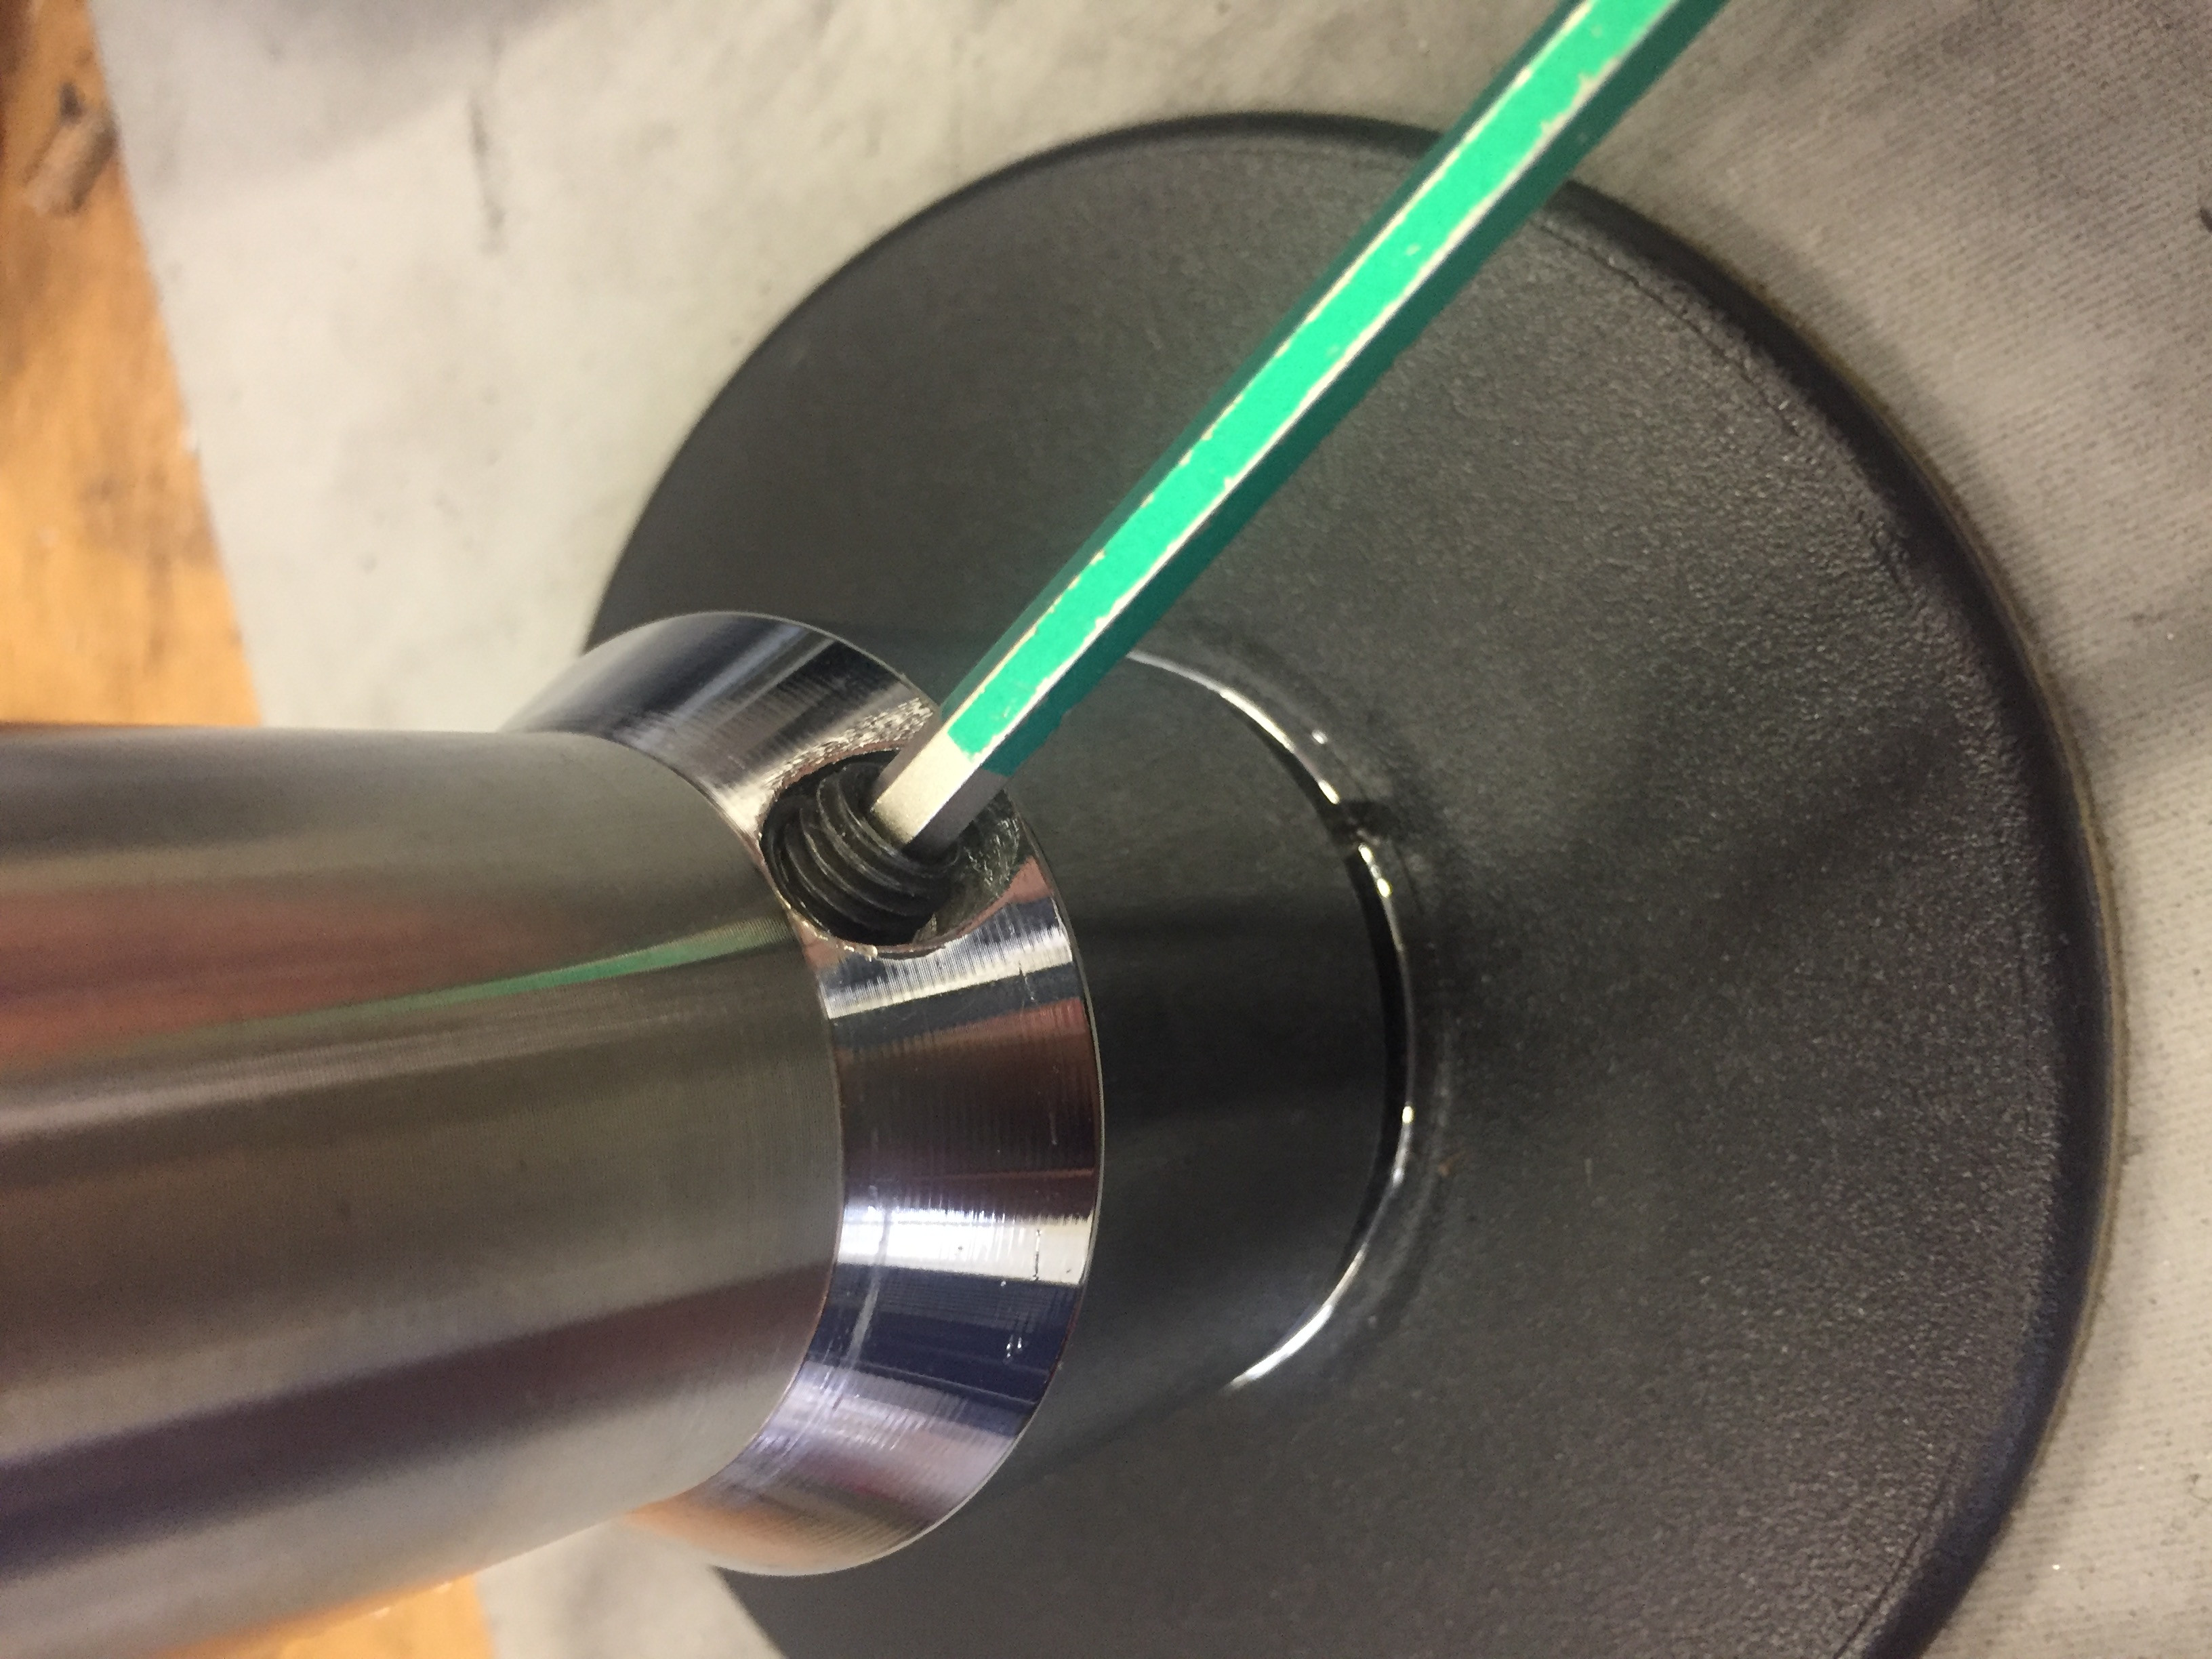
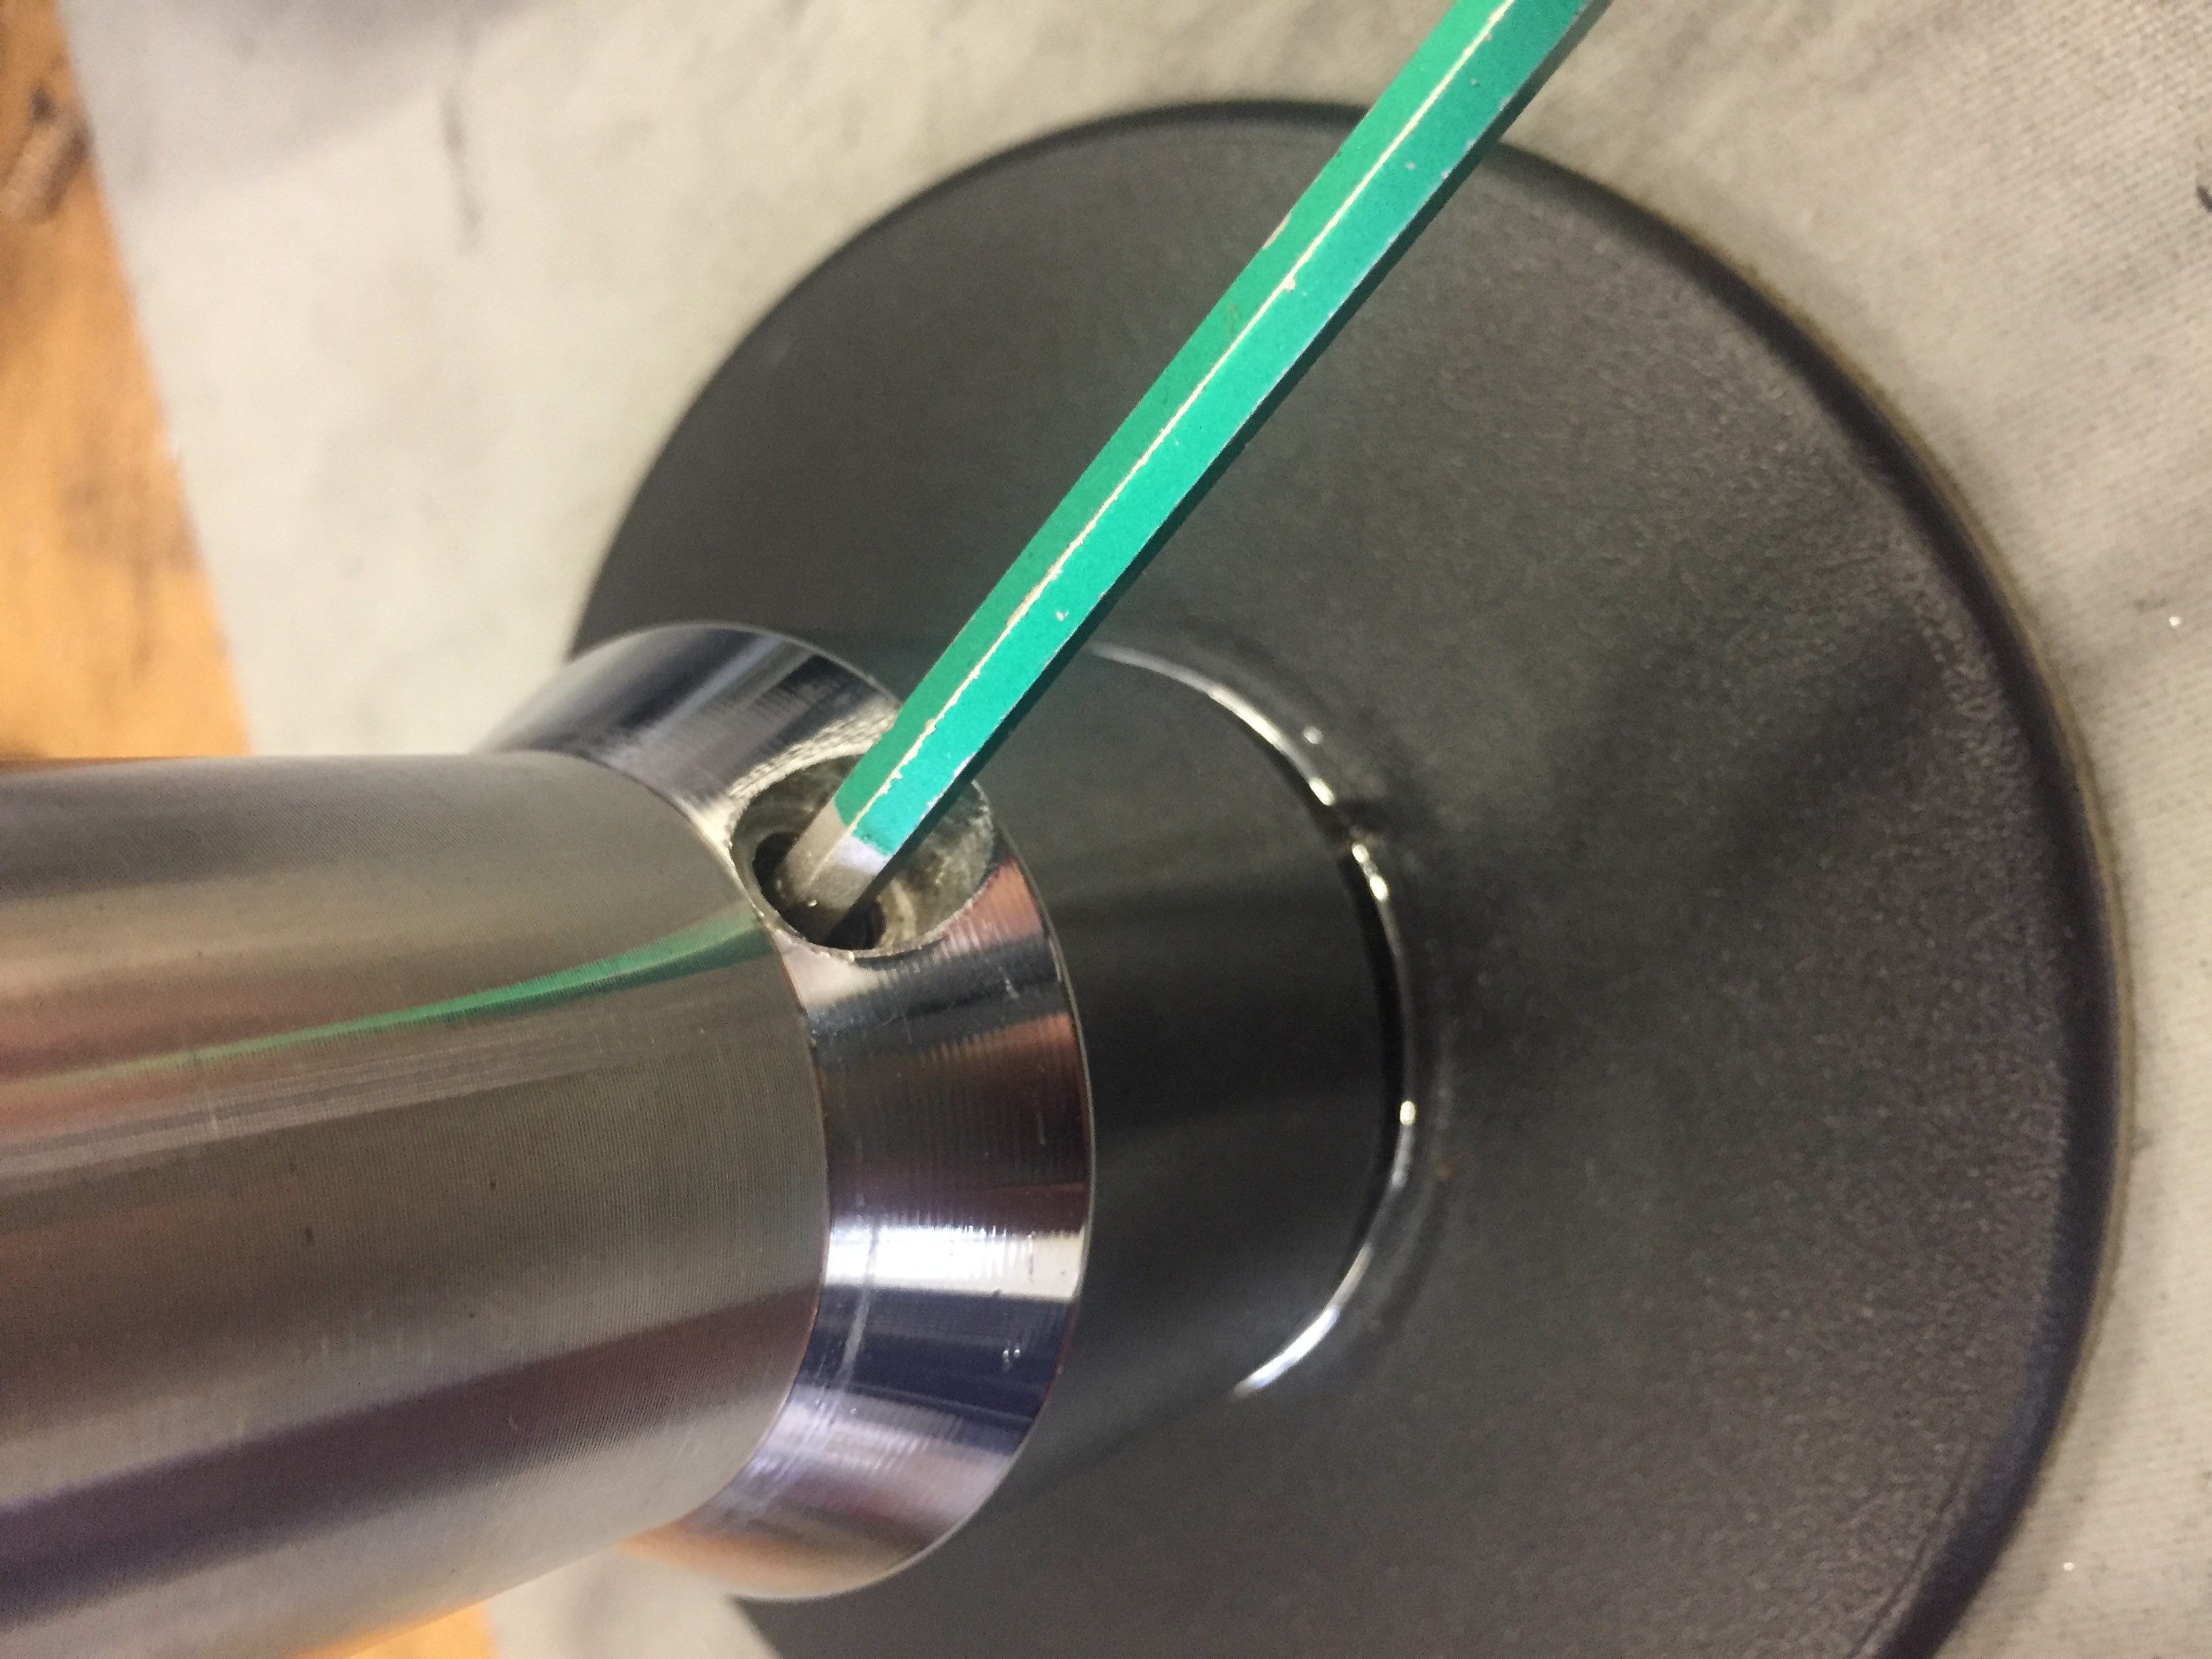
with the L-shaped spanner, align as in the photo, the Allen screw with the reference notch on the pole disc, tighten the screw only at that point and all the way down. the pole is now in static mode, pole not rotating.
/statico.jpg)
Note: if the pole in static mode does not stay perfectly still, it means you need to tighten the screw better, in the picture above, use the spanner from the spherical part on the long side to TIGHTEN, and the short hexagonal part only to TIGHTEN.
if you have a Quick Lock:
To switch to static mode simply proceed as in the video below, press the 2 buttons together and turn the bezel until the reference ( the shiny one ) is set to STATIC. you will hear a 'clock', it means you have locked the pole to 'static'.
2
- it is time to assemble the pole,
assemble the various pieces or plug-in extensions,
To do this, lay the pole horizontally on a soft surface, mattress, blanket...
and insert the pieces in the sequence shown in the table in the packaging,
( the quick lock table is different from the standard keyed pole table )
you will find 2 measurements above each pole drawing,
( from ) From 1234mm
( to ) To 1234mm
On each configured pole drawing, you will find the wording extendable from ... mm to ... mm ,
which means that the height you have measured must fall within one of these ranges,
identify to which range in mm your measured ceiling height corresponds,
assemble the pole as in the drawing immediately below.
- How to join 2 poles
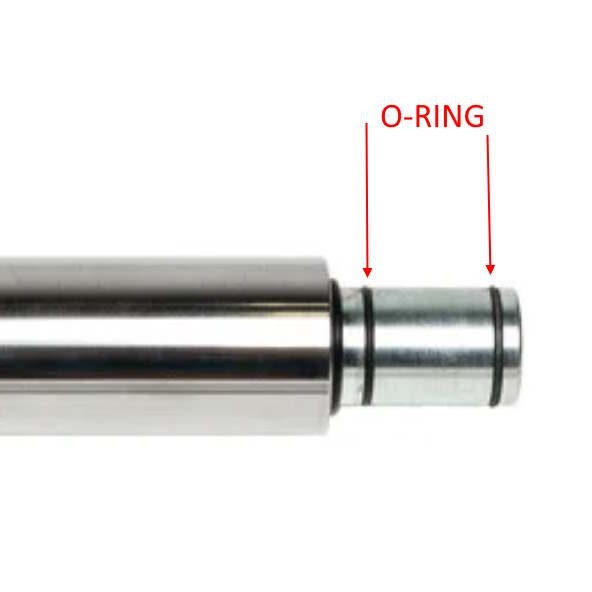
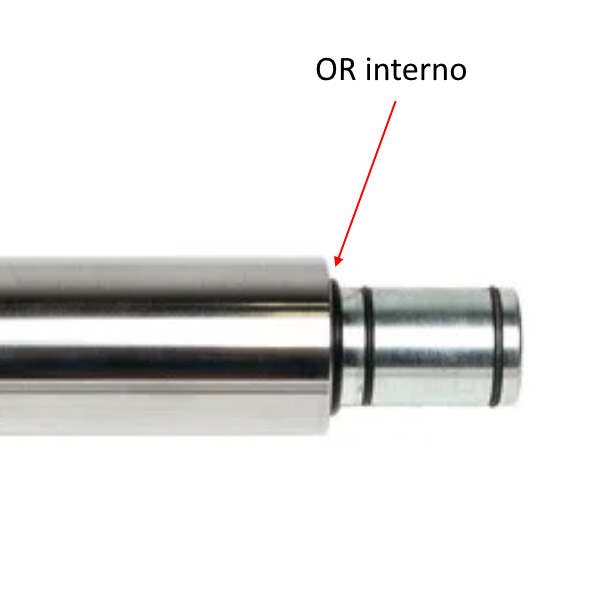
you just have to hold one pole in place and insert the other, inserting the stem into the hole, just turn the pole in a rotating direction to get it into the other, it will fit perfectly in place. Or as in the photo below, turn one in one direction and the other in the opposite direction by pushing them against each other, the engagement is very simple. The black rubber stripes are the O-rings to ensure maximum dimensional stability during use.
If you often disassemble the pole it may be necessary to replace an OR after 6\12 months, we have them or you can find them for 80 cents at the hardware store.

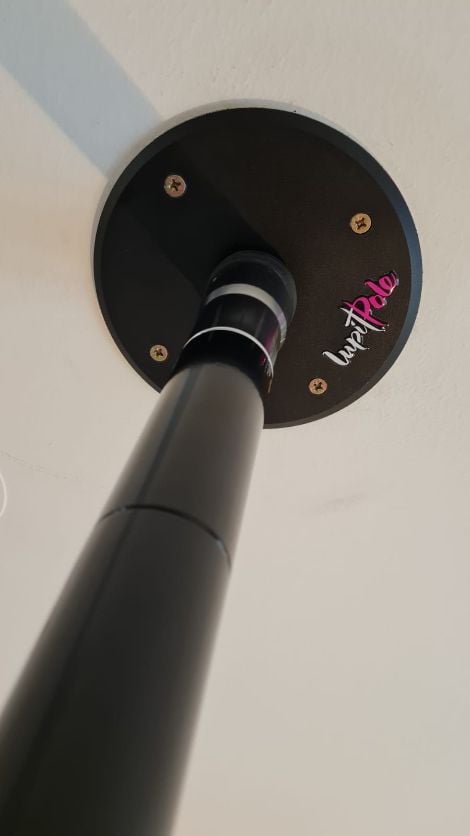
once the pole is assembled, the upper base is also plugged in...
NOTE: by the way, the 2 bases in contact with the floor or ceiling have a special orange non-slip rubber applied, this gives grip and does not dirty, these rubber discs also need a little maintenance (cleaning with alcohol every 3 months) you will find the indication of the most suitable product in the 'maintenance' menu link.
- Now you can raise the pole vertically, it must be lower than the ceiling by a few cm.
you should find yourself with the pole straight, positioned in static .
proceed with the opening of the cover in order to unlock the 2 discs inside the cover. (as mentioned they should already be unlocked, i.e. with the 4 screws loose, but let's check)
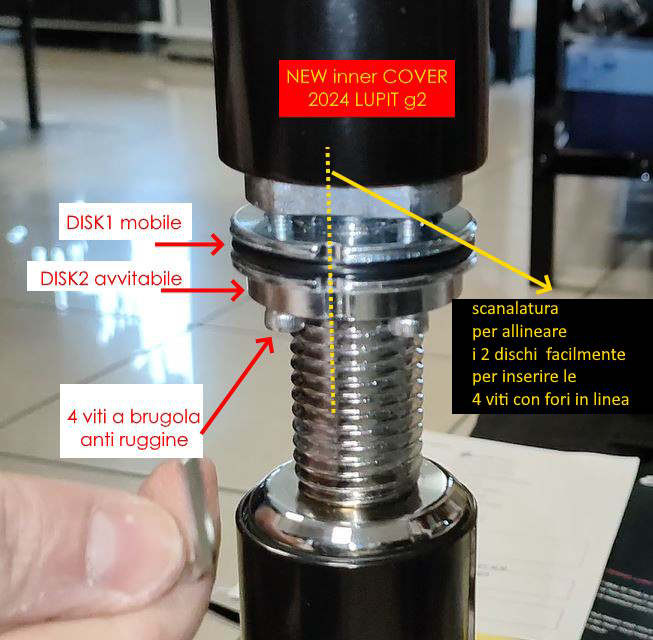
The New Pali Quick Lock internal mechanism 2024
The internal mechanism for unlocking or locking the extension and lowering of the pole, in the STANDARD and QUICK LOCK 2024 versions, has 2 internal disks to make operation even easier and more effective.
easier and safer access to the inside:
proceed to open the cover by unscrewing it as in the photo
 IN PHOTO Black model (more grip than chrome)
- Once open you will find the disk 1 (free to move up and down 'with black horizontal line) the disk 2 which is screwed to the inside shaft of the pole, 5 screws that hold the disk 1 and disk 2) proceed by unscrewing the 4 silver Allen screws without removing them, loosen them by half a cm.
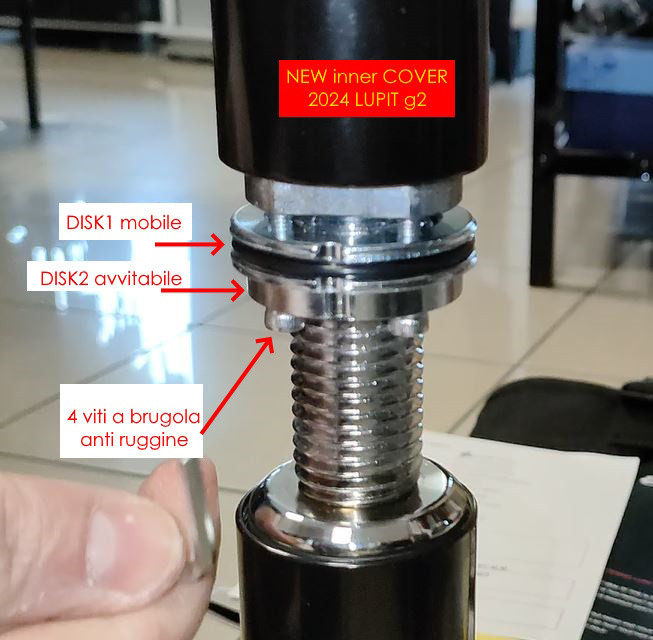
( the correct distance between pole and internal disks )
( in summary, if you loosen the 4 screws, the pole can be lengthened and shortened statically, if the 4 screws are tightened the pole will not lengthen or shorten )
Now that you have loosened the 4 screws
- you can lengthen the pole,
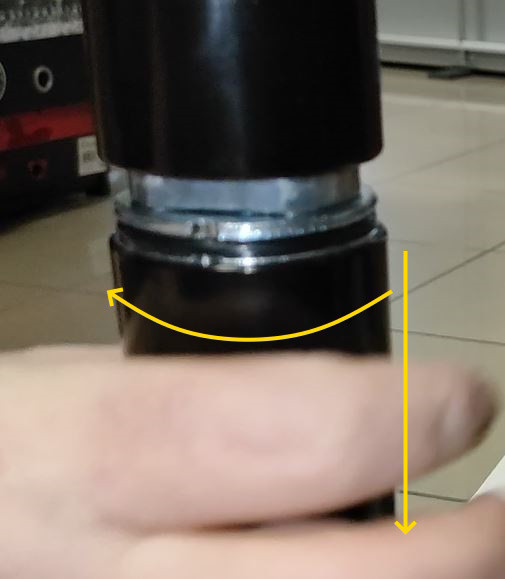
how : hold it straight at the point where you want to practice, holding the lower part of the pole steady, turn the upper part anti-clockwise, grasping it just above the opening of the cover as picture below :
In order for the pole dance pole to touch the ceiling you need to stretch it and stop as soon as the pole is able to stand on its own, it does not need to be tightened now, because you need to POSITION it first.
When doing this always keep the pole selected on STATIC .
proceed to align it, perfectly vertical on all 4 sides.
*The lower base is slightly articulated to accommodate floor imperfections.
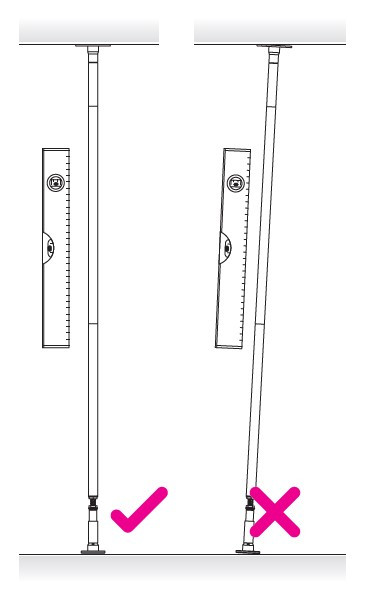
You can use a spirit level, or a mobile phone with a spirit level function, or a vertical reference, to observe on 3 sides such as the verticality of a wall...
The point is, the upper disc must be exactly above the lower disc and the pole perpendicular to the floor and ceiling. Positioning is the easiest step... if you mount it often mark the spot of the bases.
- Extend the pole to tighten it :
you can proceed to lengthen the pole again to tighten it properly between floor and ceiling.
Look for a moment where you have opened the cover there is a threaded stem, if you go beyond the halfway point, it is normal that you feel that the pole turns oscillating, the ideal is to lengthen the pole without going beyond the halfway point.
Stretch the pole by turning anti-clockwise, against the ceiling, so that you can no longer go beyond it, but without using too much force, the thrust that is exerted on the ceiling is like that of a jack, so do not exaggerate with the force exerted.
How to know when it is tight enough?
When the pole, even by squeezing it hard, does not move from its position and spins well.
It is easy to just stretch it without using too much force, until it is no longer possible to go any further.
Pull the pole with force and check that neither the upper nor the lower disc moves.
if it moves add 1 ¼ turn in height at a time.
using too much force when tightening the pole is wrong
you can brake the fluidity of the spinning due to too much tension,
in this case you only need to loosen it by 1/4 turn by lowering the pole a little... ,
If, on the other hand, the pole is not aligned properly, the concentricity will be affected, you will find that the pole will spin not concentric.
in this case, just align it better....
as you can see, an excessive tightening with consequent tensioning of the structure can be identified by the behaviour of the pole.
it is easy to apply a lot of force without realising it... You have to find the correct setting simply by performing the tensile test.
- How to finickily adjust the pole elongation ...
you can use a standard rule to start with .. i.e.
turn the pole up, until you start to feel resistance, stop, give it another 1⁄2 turn, and do the
TEST1 or stability test...
Without climbing on it, tug and push on it, to check that the lower and upper discs don't move, also do this with force... It is normal for the Lupit g2 pole to flex, the Felx System Adsorber prevents the pole from stiffening thanks to the articulated joints, flexing slightly, the structure is as secure as one piece...
Doing this test (tugging and pushing), if the base moves underneath, you have to add 1 ¼ turn in height... and try again, until it doesn't move anymore.
there are 2 things to check
pole not moving
(i.e. sufficiently tight for it to be stable and secure)
and pole that pushes smoothly
(this is a check you will do after you have tightened the screws of the 2 internal discs and put the pole in Spinning Mode)
Obviously if the pole spins poorly or jerkily, it means that it has been stretched too far and is over-tightened, so remove tension by lowering the pole by 1⁄4 of a turn.
This is the longest and most accurate way to do the stretching fix..
>FLEX SYSTEM
the force you impart to the pole while training is self-distributing thanks to the FlexSystem so the pole must flex when you pull on it to see if it is properly secured.
When the pole height is set correctly you will know because the pole is stable and the spin is smooth.
I recommend that you mark the position of the lower and upper discs at this point so that if you need to remove and reposition them the operation is quicker.
In addition, if the pole should settle over time during use, or move a little, you will see it immediately and you can tighten it up by lengthening the pole by 1⁄4 of a turn.
- Now that you have stretched the pole move on to the second step, locking the extension:
All you have to do is attach the 2 discs inside the cover, which block the height, since you no longer need the pole to lengthen or shorten, in fact you do NOT want it to move from that height ...
so that the pole can no longer be lengthened or shortened....
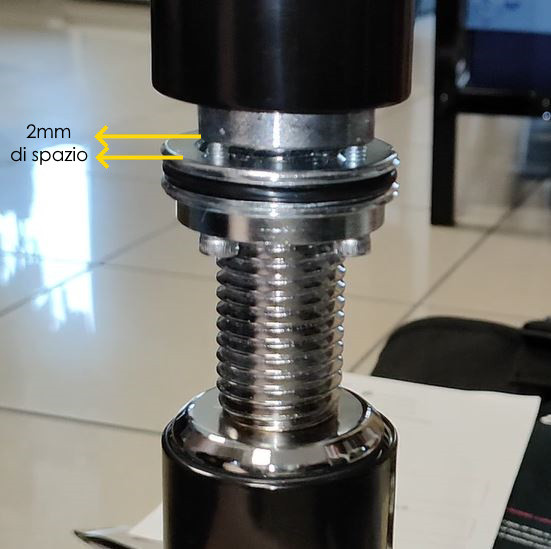
Bring the discs towards the pole then upwards (by rotating DISK2), leaving a distance of about 2-3mm from the pole. as in the picture
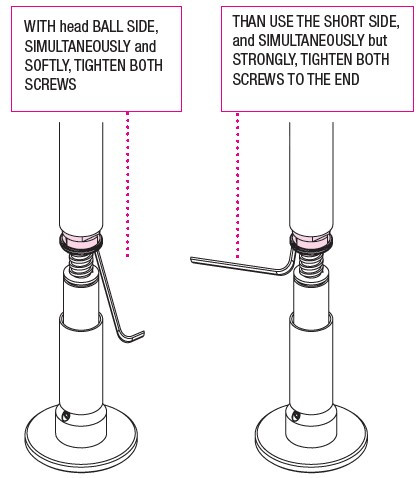
These are the screws
To tighten the screws quickly you have easy references (in case you have removed them).

If you have unscrewed them, how to tighten them quickly...
align the outer notches of the discs, this will also align the inner holes. KEEP A SPACING OF 2-3mm gaps between pole and disc as in the photo...
insert the 4 screws one by one to point them using the L-key on the long side or your fingers... to tighten them quickly.
Then tighten with the short side of the spanner. Caution, only turn the spanner if you have inserted the hexagon of the spanner well into the recess on the Allen screw. Otherwise you risk stripping the screws and will have to replace them.
- testing correct assembly of the height block before training :
TEST 1
INAMOVABLE (already done) tugging on the pole which must not move so it has been stretched sufficiently. You can add a test of climbing the pole in spinning mode.
TEST TEST 2
height locked
put the pole in static,
turn the pole on itself as when you stretched it, to fix it to the ceiling,
counterclockwise and clockwise with force, even suddenly, the pole must not sag or turn,
if it does then you have to go back and tighten the 4 screws, you probably haven't tightened them but only pointed them, or you haven't left enough space or too much between pole and disk.
2-3mm is the correct distance.
Do the test until the pole does not lengthen or shorten by turning it on itself.
Now you have assembled the pole and carried out all the possible tests, you can practice safely.
* Tests 1 and 2 should be done before training at least every 2 days
maintenance requires that every 30 minutes of training you do a check for the first few days of use, with the 2 tests above,
1 of satiety, i.e. tugging on the pole,
2 of shortening, turning the pole from static,
in xpole poles the test is every 15 minutes of use..
in any case i recommend doing it for the first few days so you get familiar with the pole and its adjustment.
* the pole is simple to assemble, what you read here are nitpicks, but they contain all the possible situations that you may encounter during assembly, being the first time for you in assembling the lupit g2 pole, it is better to know all the various manoeuvres to be carried out for a perfect setting.
----------------------------------------------------
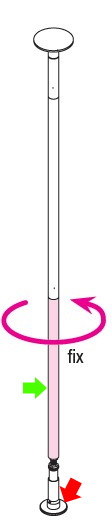
closing the template
By turning it anti-clockwise you will screw the template to the pole, if it resists it is because the thread is of a specific fine type, so it will take many turns to tighten it, but this work is rewarded with safety.
/chiusura%201.jpg)
/chiusura%202.jpg)
/chiusura.jpg) IN PHOTO CHROME MODEL polished excellent grip.
IN PHOTO CHROME MODEL polished excellent grip.
the grille must be tightened by screwing it firmly,
in fig.1 the grille is screwed onto the first part of the height locking discs
in fig.2 the black gasket passes through and is screwed to the second
part of the upper disc
in the last figure, the template is also screwed to the pole, taking all parts together.
these are not trivial instructions, no one will ever explain it to you so repetitively,
sorry if I have gone on at length, trying to use language that is as simple as possible, but even in the videos we never go into so much detail, these are additional explanations that we feel we must give to our customers so that they can make the best use of Lupit Pole equipment
Certainly the assembly procedure for the Lupit g2 pole dance home, is longer to write and, read than to perform,
but here you will find all the tips in Italian for this pole, the magnificent lupit g2 pole.
Keep in mind that the more coated the pole material you choose (black for example), the more force is needed to tighten the template the first time.
----------------------------------------------------------
The 2024 locking system is an ingenious improvement on the previous one,
In the new version, there is no longer any need to pay extreme attention to the force applied to the four screws for correct clamping; everything is much simpler.
How do you do the TEST TESTS before climbing the pole the first time?
THERE ARE 2
FIRST TEST
adjust the height, i.e. the force impressed on the ceiling and floor, by tugging the pole so that it does not move.
at this juncture also check that the spin is smooth, if not adjust the height of the pole, as described above
SECOND VERIFICATION
Now you MUST check that you have locked the mechanism for lengthening and shortening the pole ..in a suitable way,
there are only 4 screws, they must be tightened, the important thing is to maintain a distance of at least 2 mm from the pole, the discs must not be attached to it.
the test:
-put the pole in static,
-with a firm grip try turning the pole left and right.
Did the pole lengthen or shorten? while turning it in static?
NO?!
then it means that you have done everything correctly, the internal locking system is secure you can close the jig and practice.
did it shorten?
If it shortens by turning it means that you have not followed the instructions correctly
leave a 2mm gap between the discs and the pole, and tighten the 4 screws with the same force....
and repeat the test, now it should no longer turn, you have blocked the lengthening \ shortening system,
close the jig and practice quietly.
TIP:
Make a mark with a pencil or any other system to mark the lower disc.
That way, if after several training sessions you notice a loosening of the stability or a shift of a few millimetres, you will see it immediately, and when you open the template, all you have to do is lengthen the pole a little or tighten the screws, as you learned to do above...
The visual reference system is very practical,
an alternative is to carry out two checks before each training session.
Or, in order not to stress the pole too much, always perform the spinning figures in spinning mode.
In any case, if you master the pole, and know it, you will always train safely.
Pressure poles require more attention to adjustment than custom-made school poles such as the LUPIT PRO G4, which, being fixed, removable and one-piece, do not require adjustment. You can request a school pole here: lupitpro 4
at info@italiapoledanceshop.it with a quote and height measurement.
The first time is like having a new electronic article you have to learn the functions and settings, then it becomes automatic... and easy.
Have a good workout.
Maintenance
- discs in contact with ceiling and floor are recommended to be 'refreshed' every 3 months by cleaning them using 'Nitro Diluent 900' and soft cotton wipe, this will make the surface sticky again.
NEW LUPIT POLE CLASSIC G2 Stainless steel is removable, a multi-piece pole that can be easily installed/removed in just a few minutes by a single person.
Quality rubber surface, unique upper disc Flex System and patented Safety Block Nut ensure maximum safety to the dancer.
Dancer gets the highest satisfaction on this pole because it is totally smooth from the top to the bottom, it is safe and reliable, has amazing spin and optimum grip.
The pole is made of high quality materials such as high POLISH STAINLESS STEEL - allergies free.
QUESTIONS and ANSWERS:
Spinning the pole
We are sometimes asked the question ' can the speed of rotation be adjusted? '
At most you can adjust the height of the pole well, the narrower it is in height the less smoothly it spins, we refer you to the pole assembly where this is also explained.
Obviously there is no need to adjust the speed of rotation, it is the poler that imparts the speed of rotation to the pole which is more or less rapid in rotation depending on the quality of the bearings, not in turning weightless but in being fluid with the poler above the pole.
The job of quality bearings is to be precise, durable, and smooth, and Lupit Pole bearings are made for Automotive so high performance.
In addition, they are twice as long as 4, instead of 2.
The task of the bearings is to make the poles spin smoothly and evenly. Lupit Poles are also equipped with the flex system, which absorbs the force exerted by bending, distributing it equally and improving spin.
In order to have a smooth and fast rotation, it is essential not to overload the structure of the multi-piece pole with unnecessary tension. stretching it by tightening it to the maximum makes no sense... finding the right setting does.
POLE DANCE POLE BEARING MAINTENANCE
Bearings are maintenance free, but keeping this habit will keep your pole looking as good as new.
Every 3 months, vacuum out any dust from inside the upper base and lubricate the parts below with a w40 bearing spray to keep them smooth and performing.
Bearing spray, lubricant, ( BEARING ) W40 bearingspray is also fine,
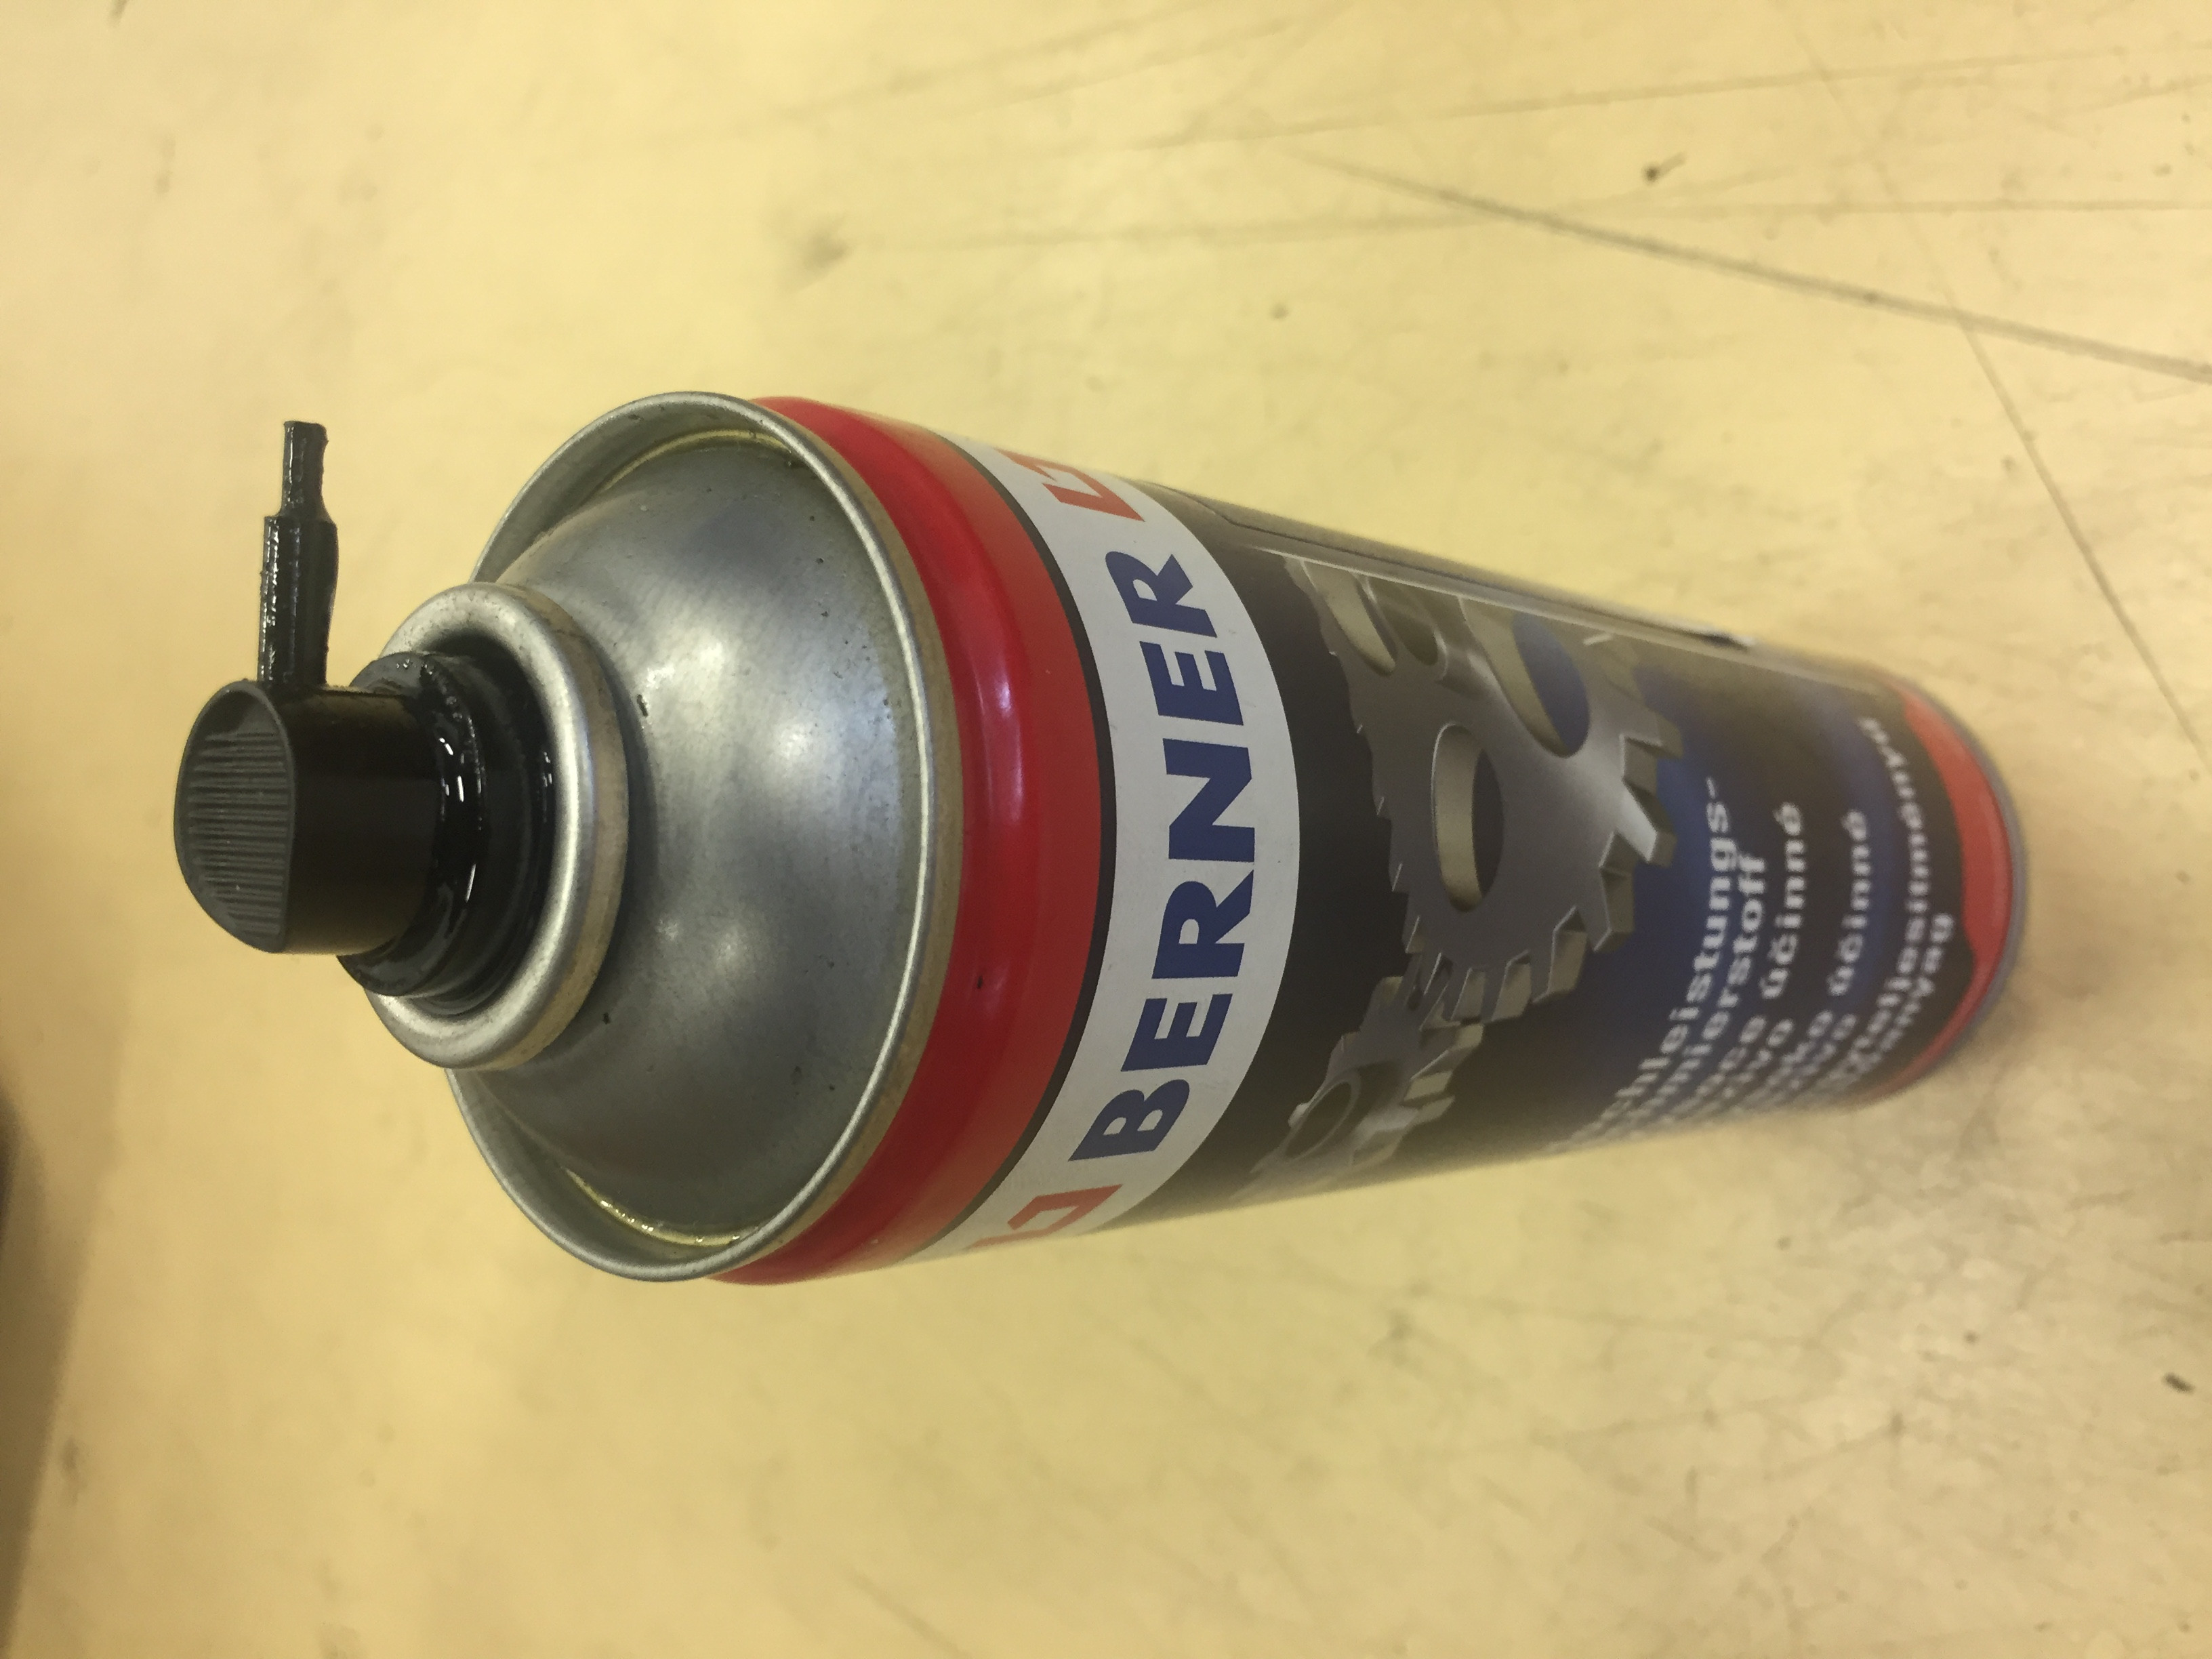
Use the cannula included in the spray bottle.
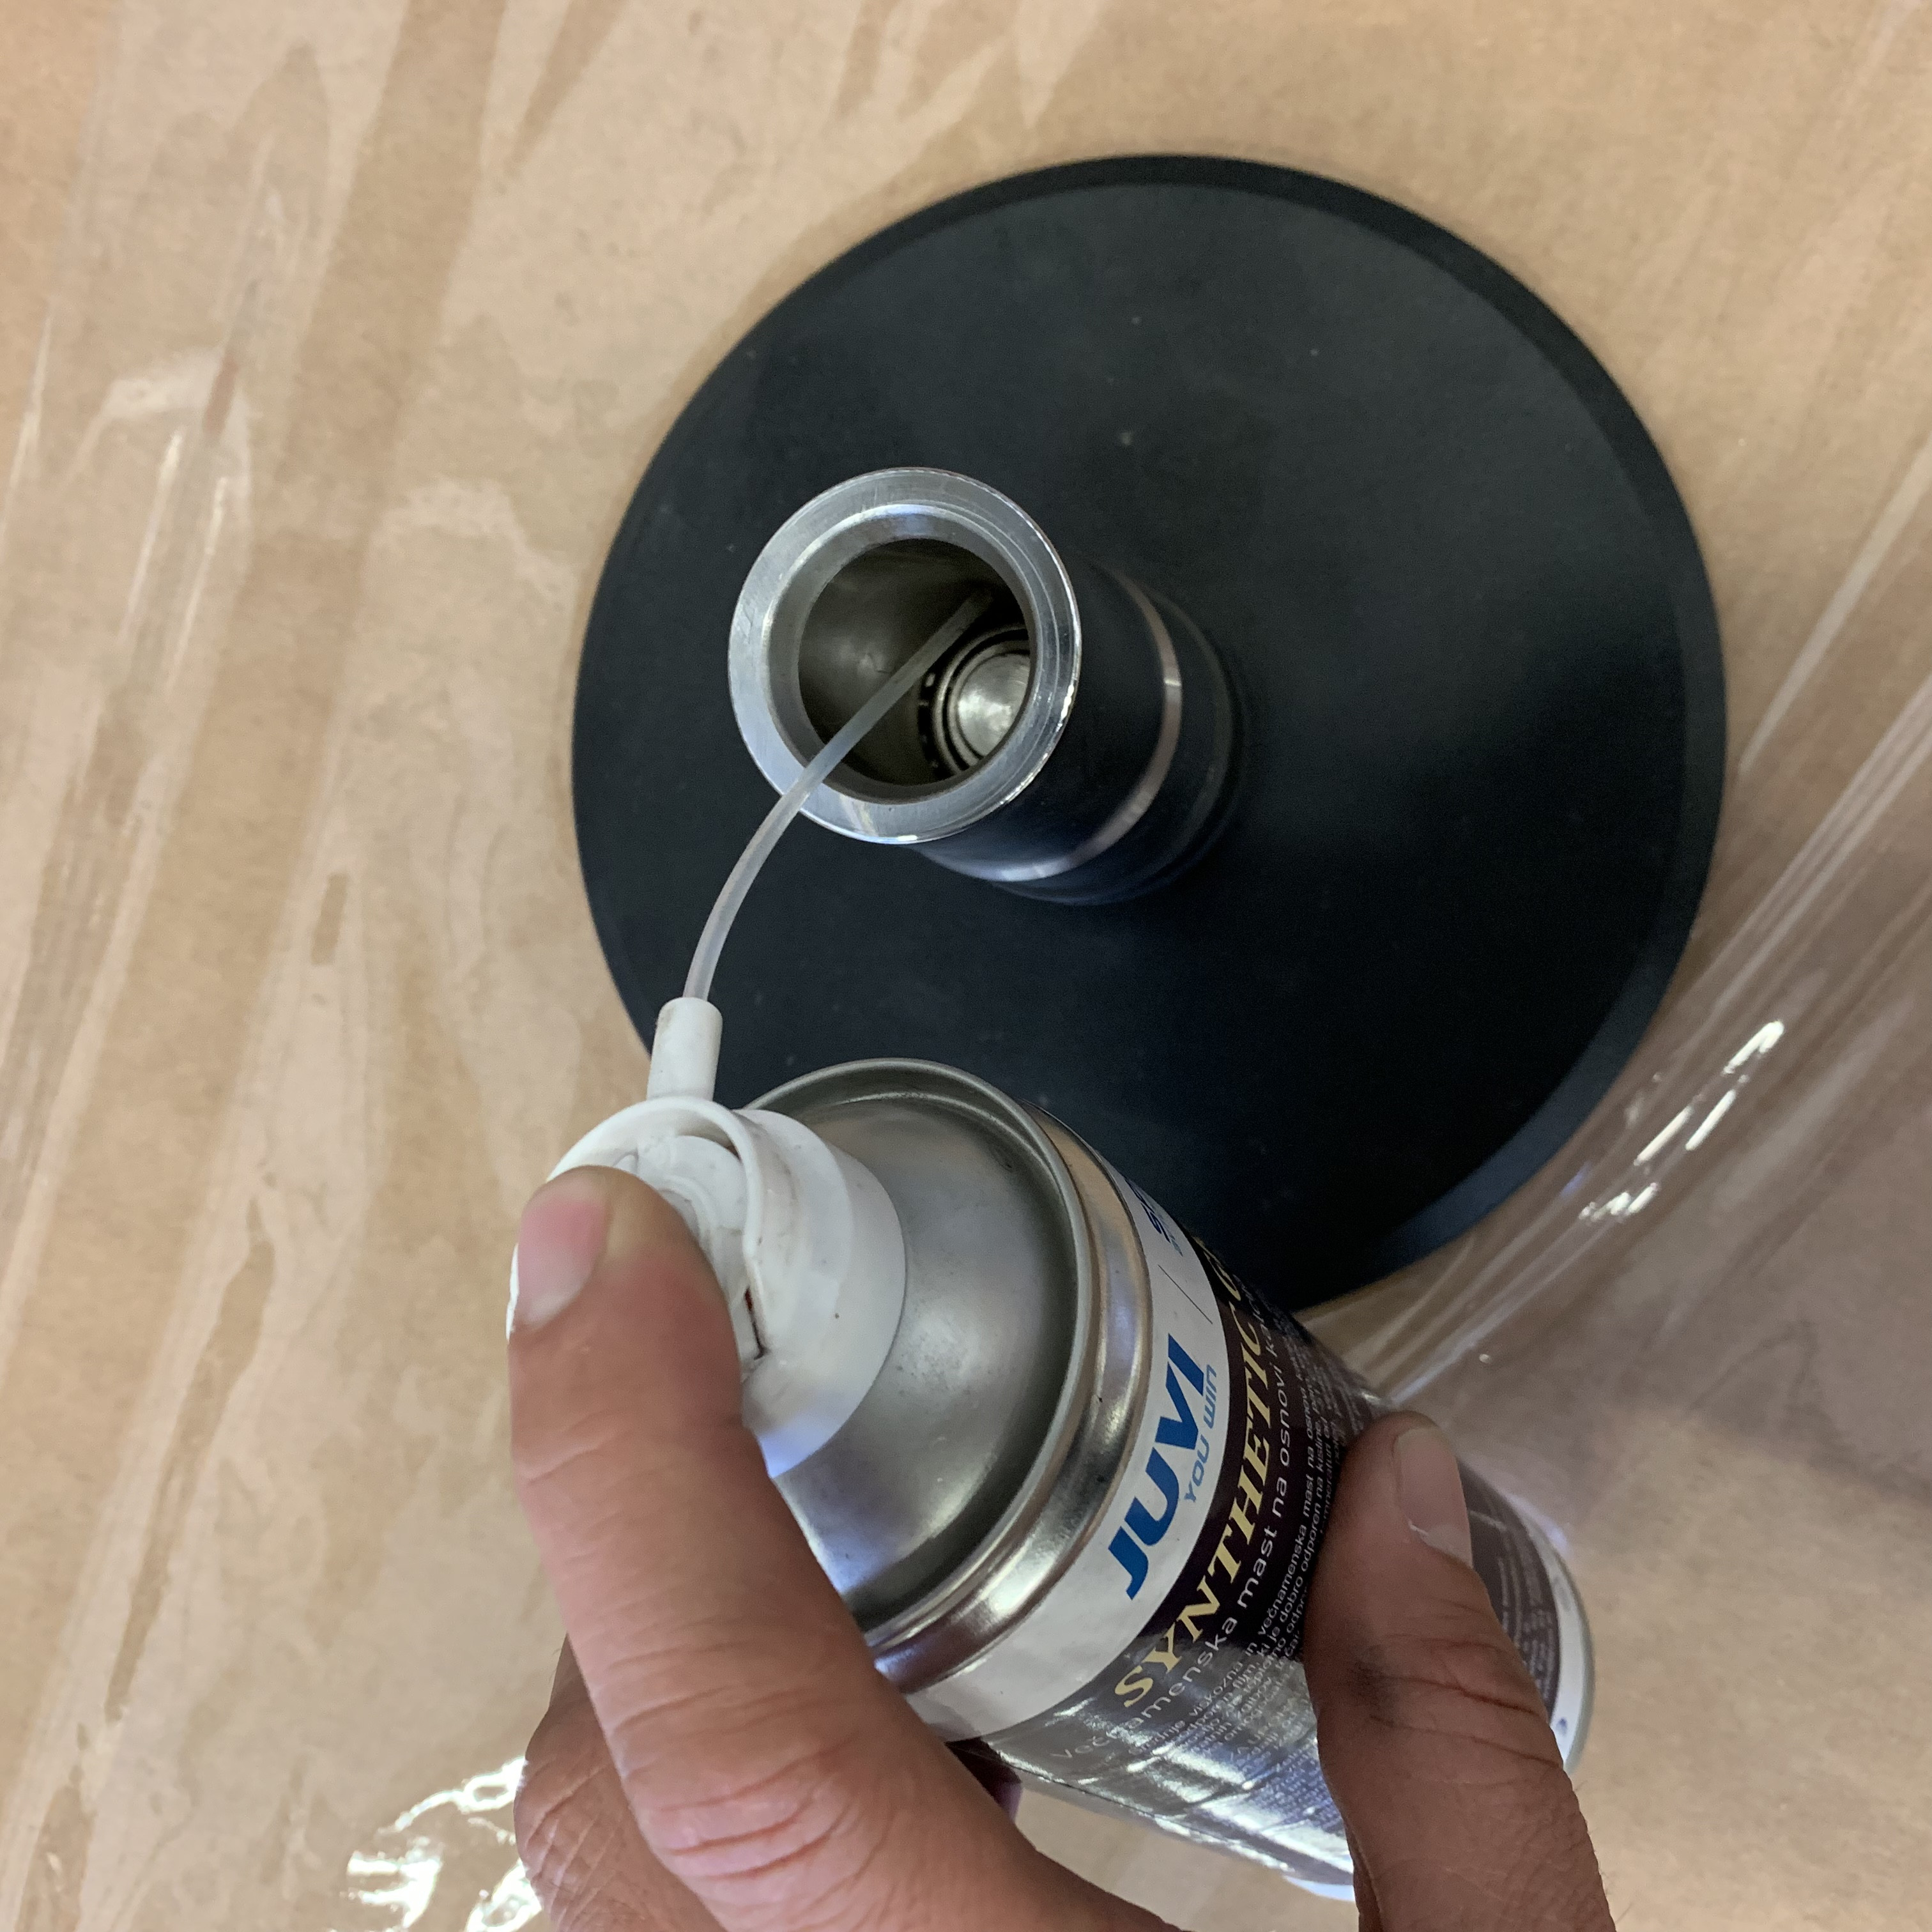
The parts to reach are: inside the bases, the bearing

First point to lubricate, the circular plate at the top, contains the bearings,
carefully vacuum up any micro-dust, there must be no dust inside.
Spray the lubricant onto the bearing as shown in the photo, spin to get the product all the way into the coated balls of the bearing.
the second point through the spinning and static hole on the lower base. ( the quick lock does not require this maintenance
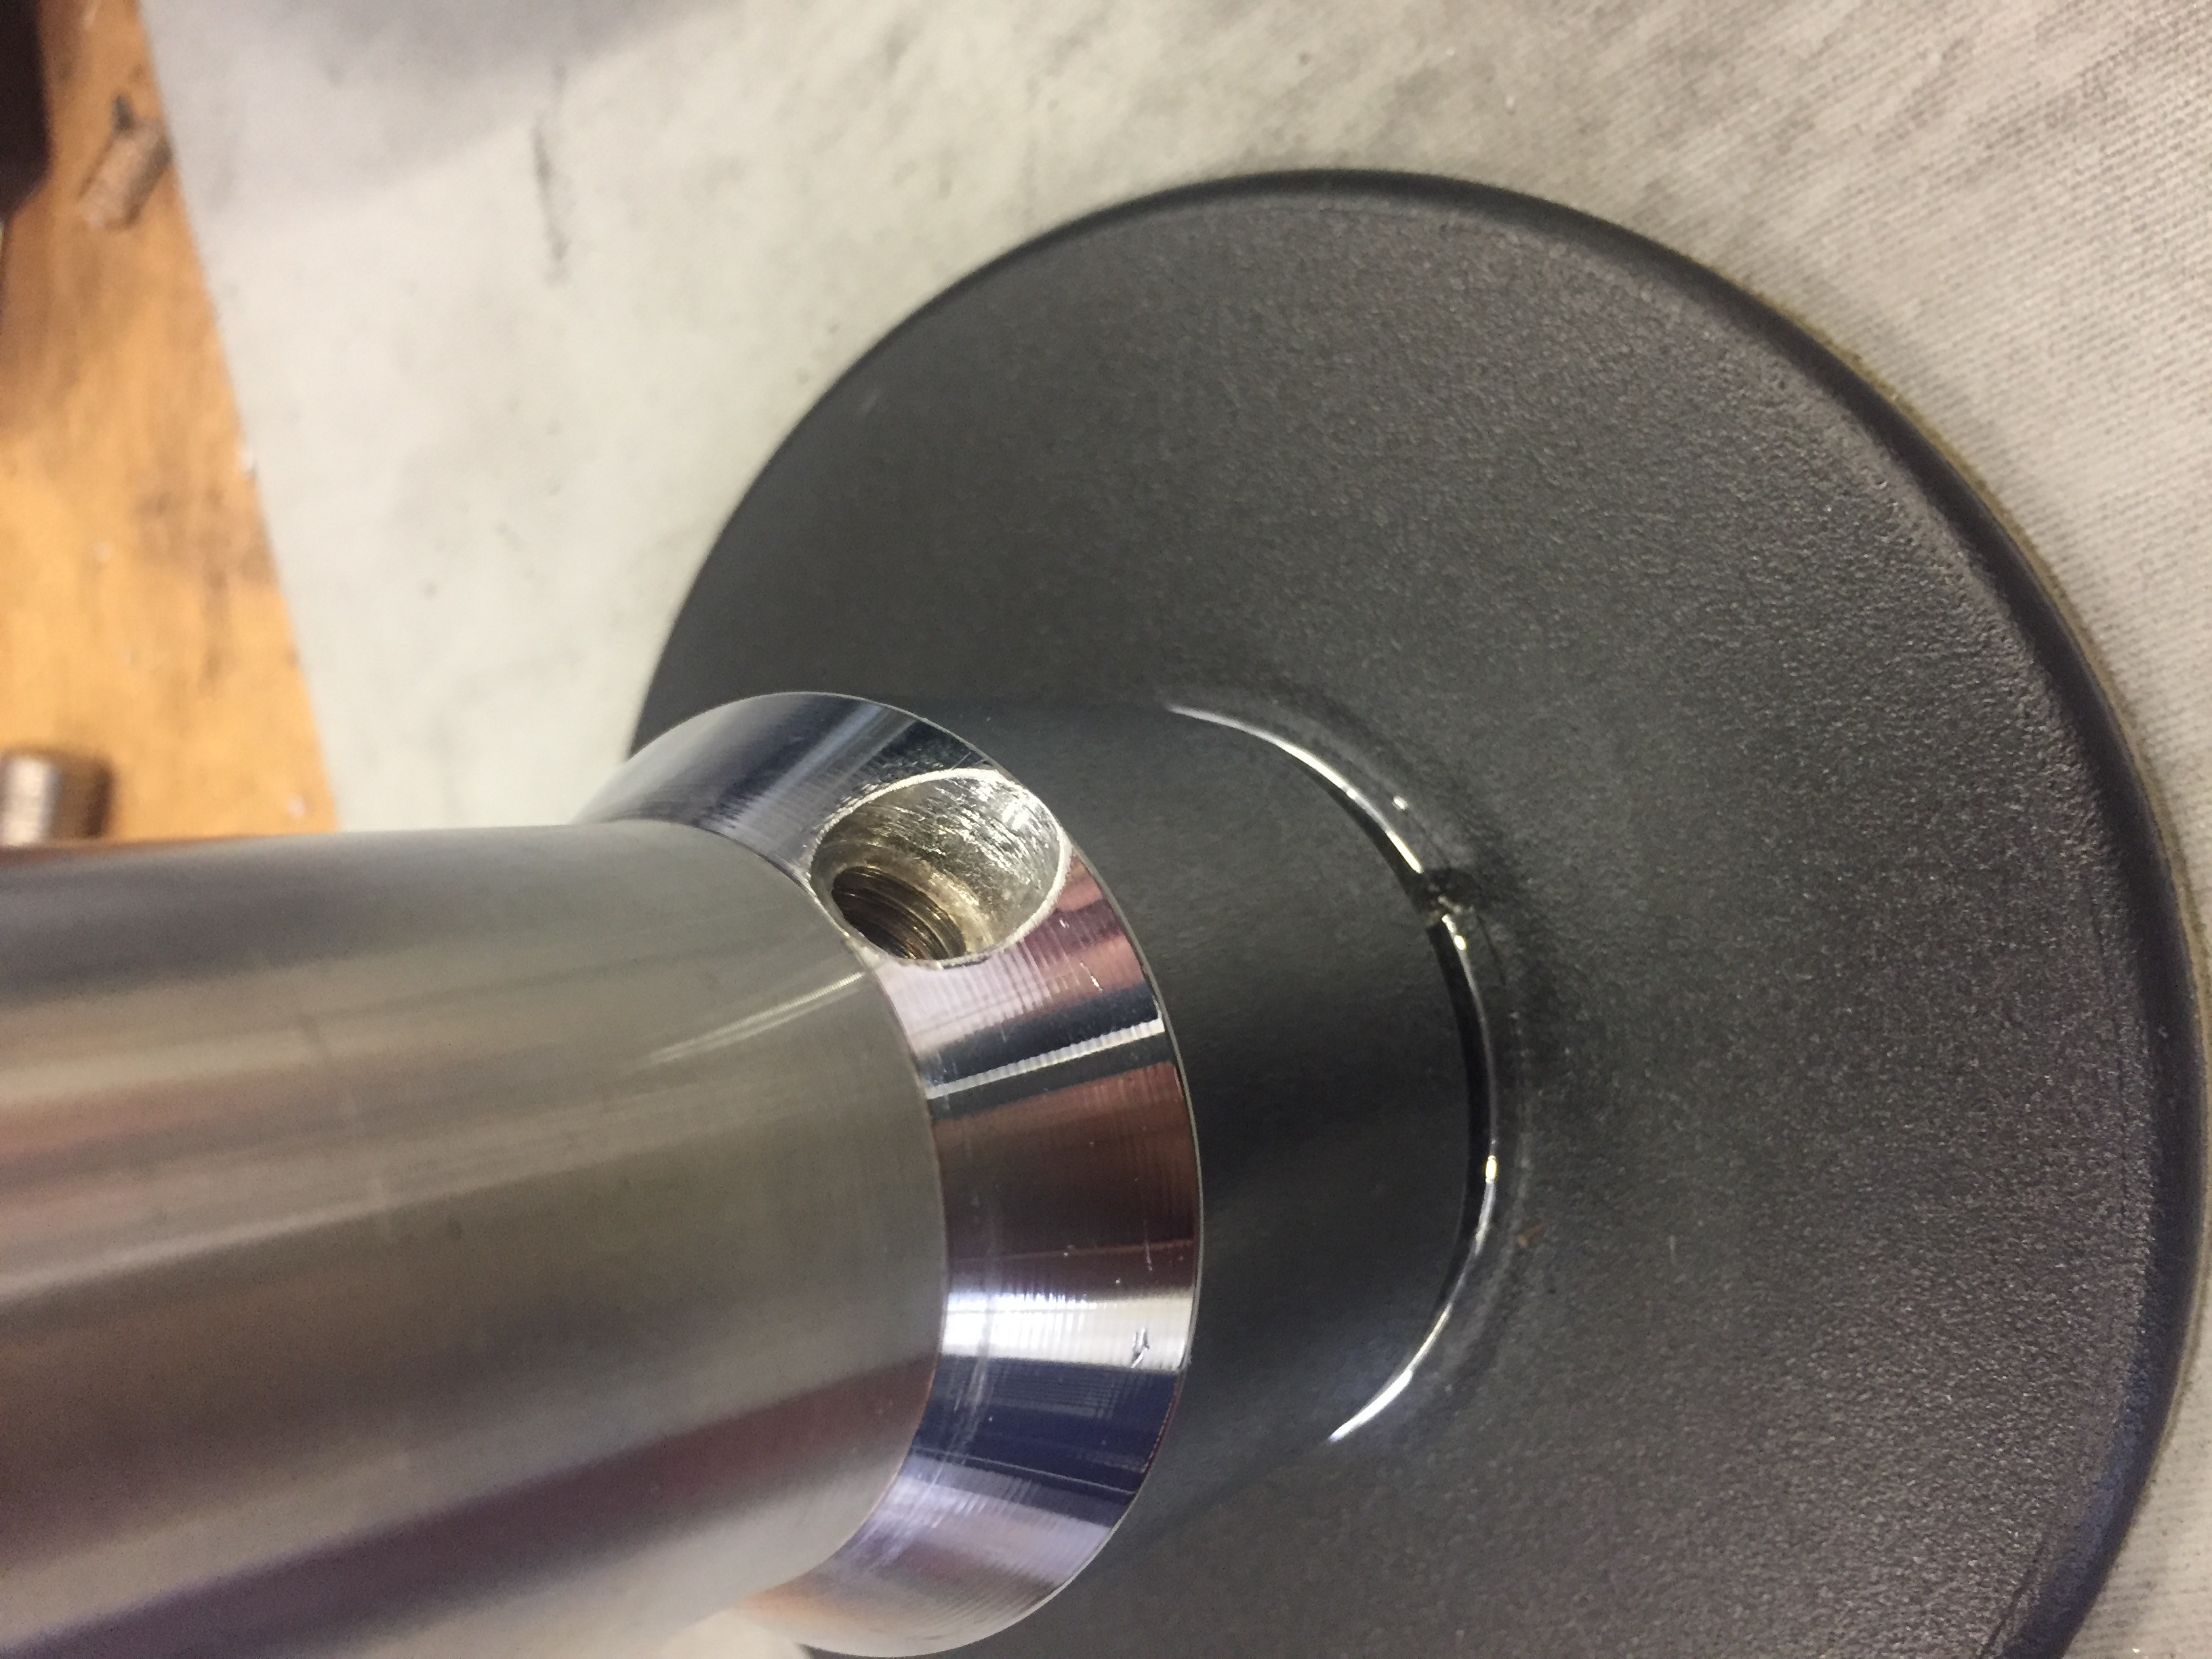
You can also spray this product for preventive purposes once a month on the part where the spin static screw is screwed in.
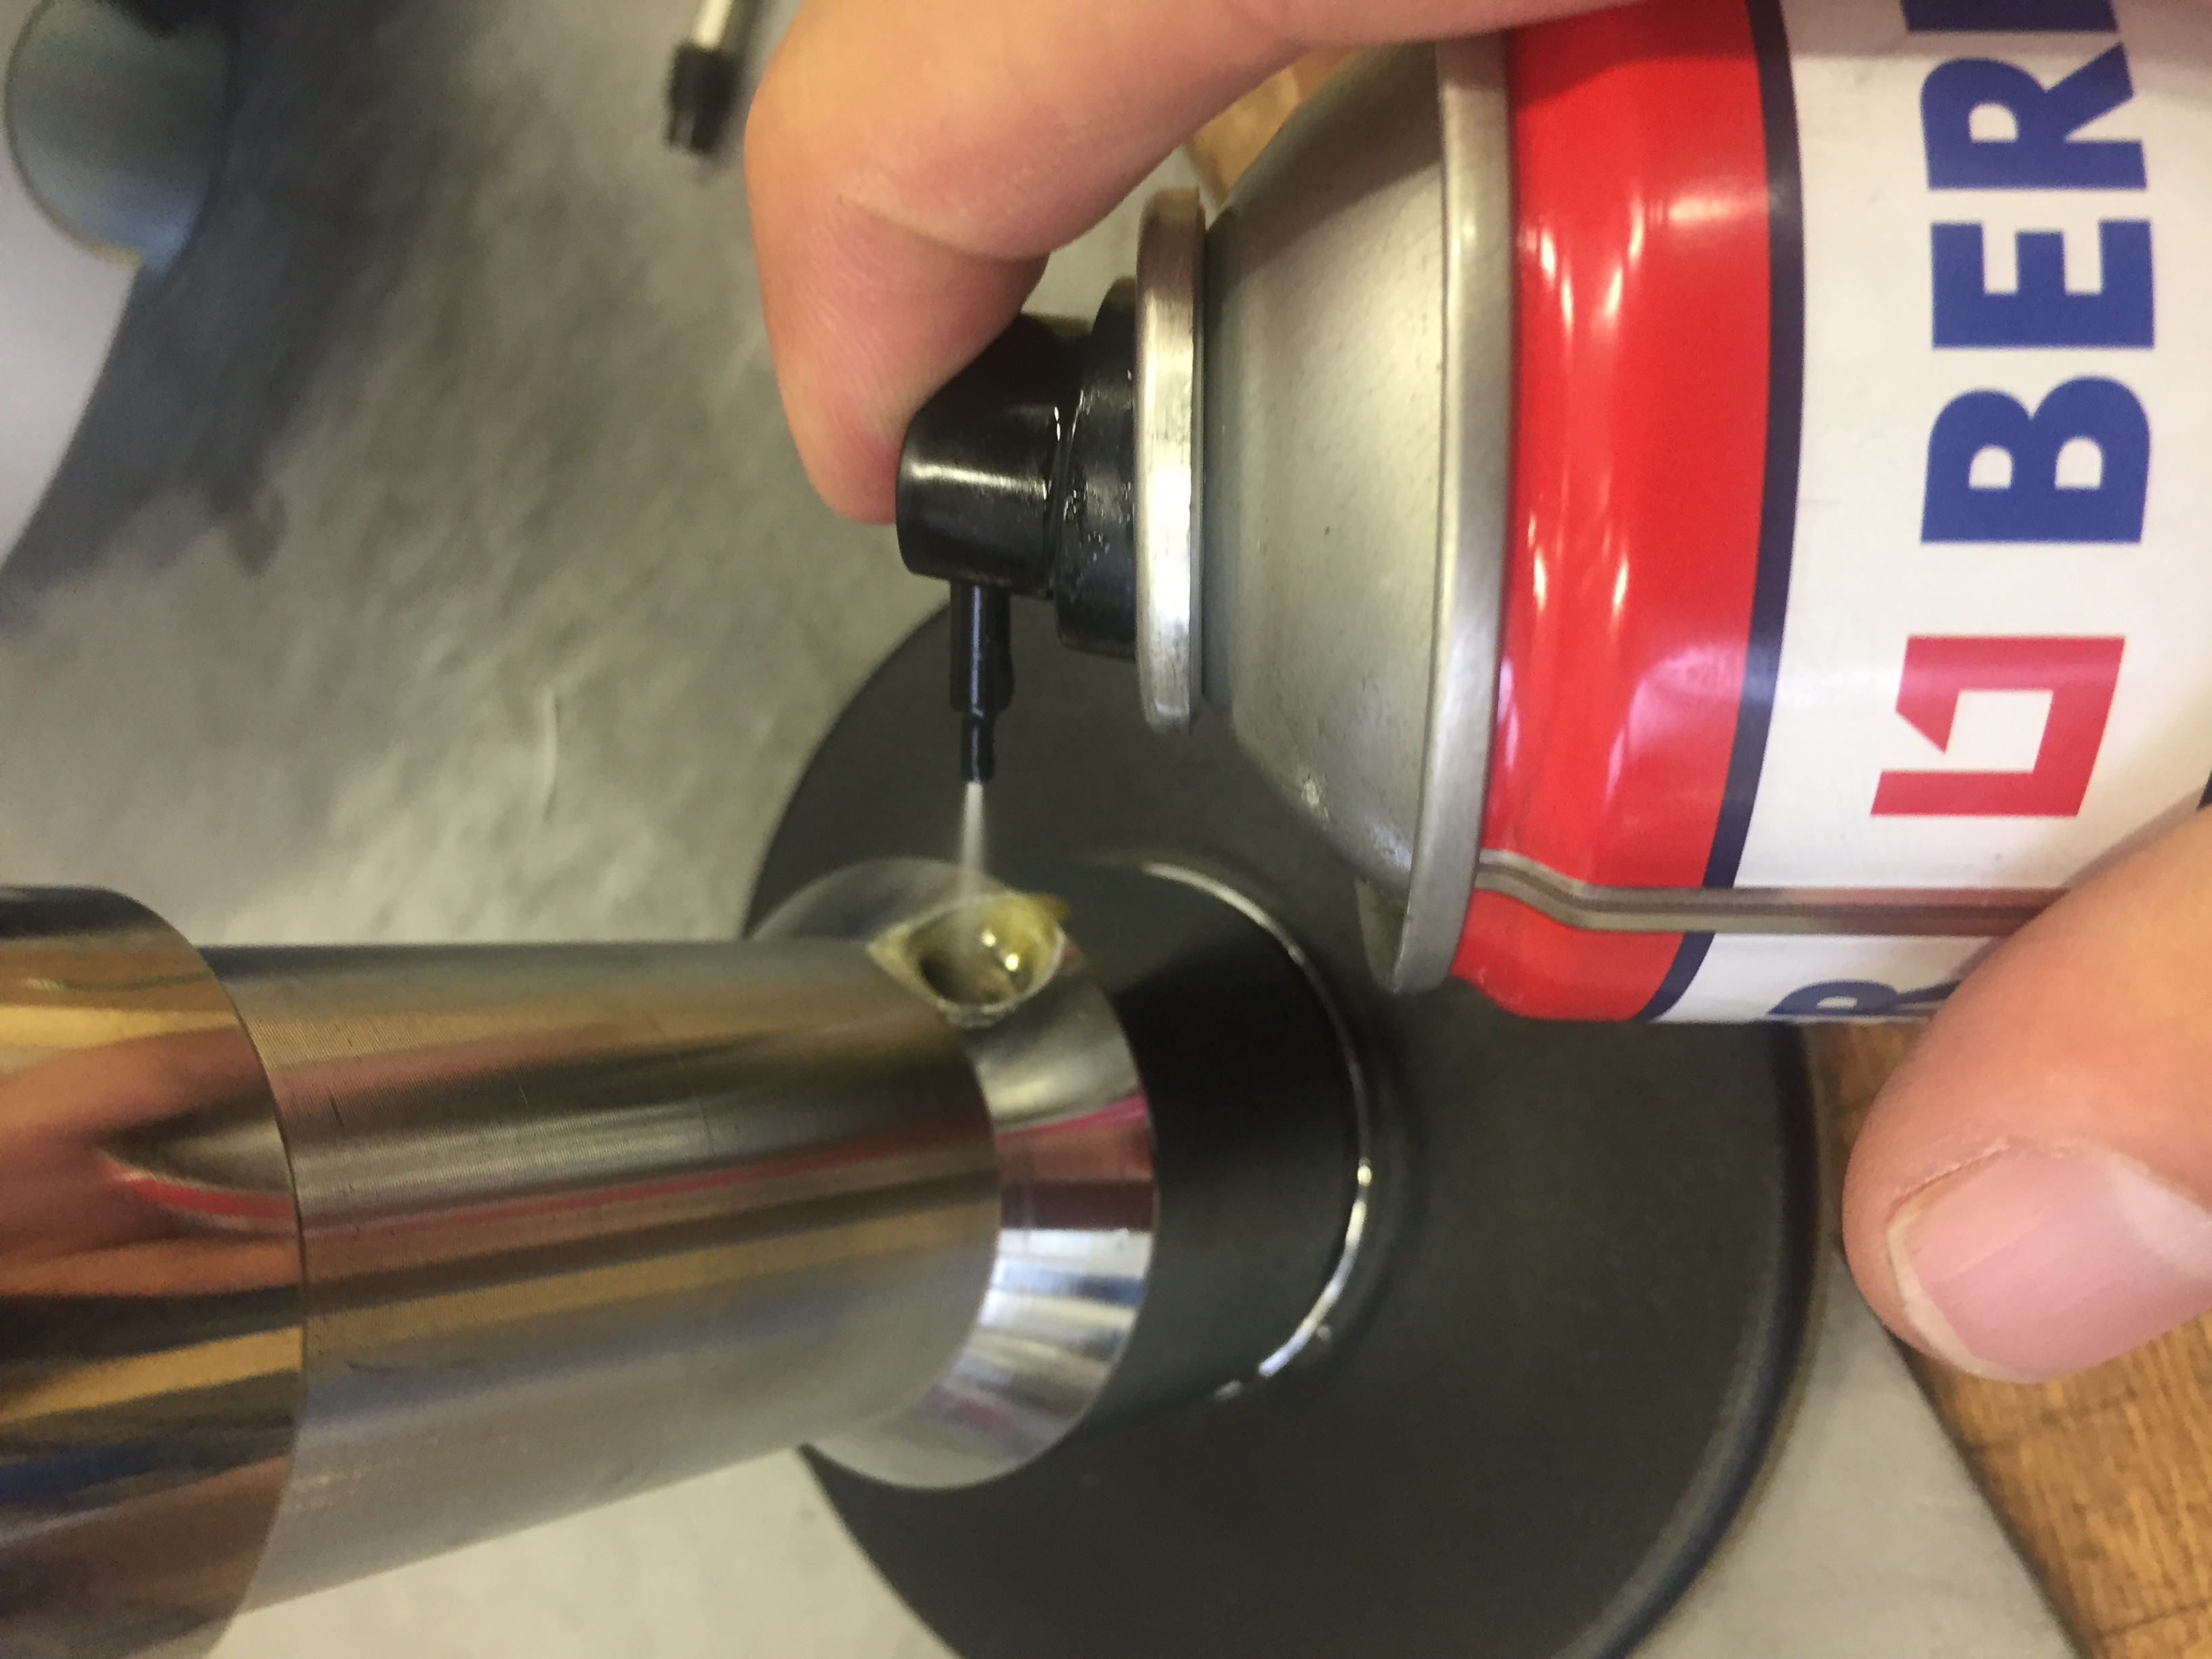
After spraying, turn to spinning mode to let the product take hold and insert the screw.
to change from spinning to static mode, align the screw to the notch on the bottom
place the screw on the Allen key (as pictured below), and insert it slowly or with just your fingers to tighten the threaded ridges correctly.

After this operation, put the pole in spinning and rotate it.
Let the product catch in the bearing,
you will immediately feel the sliding effect.
This operation can also be repeated once a month for lubrication purposes.
The important thing is to use the product in the photo.
Addition: on this occasion you can also dismantle the various pieces of the pole that you have joined together with the clutch, to remove and clean off any residues of leather, sweat, etc. that may have accumulated over time and may oxidise. The clutches are made so that nothing passes through them, but once a month giving the pole a preventive clean and dismantling it is useful for its longevity.
------------------------------------------------------------------------------------------------------------------------------------------------
Cleaning the materials that make up a LUPIT POLE
Depends on the coating:
- Stainless steel and chrome poles can be cleaned with a cotton cloth and Nitro 900 thinner, or pure alcohol and then wiped with dry cotton or microfibre cloth.
- For powder-coated parts use only neutral, non-aggressive products
DO NOT USE CHEMICAL BASED CLEANERS ON POWDER COATED POLES.
Make sure not to use glass cleaners, especially if they contain ammonium hydroxide cleaning agent
- Cleaning the rubber surface of the discs is also very important. Use pure alcohol for regular cleaning and nitro thinner 900 to refresh the surface to make it stickier
Complete cleaning procedure
1 carefully remove any deposits on the pole, (grip, sweat, etc.) with a clean cloth and alcohol or nitro 900 ( stainless steel and chrome not on black or colour where chemicals should not be used )
Use a soft (non-abrasive) cloth to remove dust, salt and other deposits from use.
2 Wipe with a clean cloth to dry.
If you use water and detergent to clean the painted post, make sure it does not contain corrosive agents, as it is a good rule of thumb for cleaning the painted coating to use non-agressive products.
For example, NATURAL ITAC2 SPRAY is the most suitable, both because of its antibacterial cleaning speed and because it cleans and renews the pole while protecting its surface.
Pole samples
Below are some Lupit Pole champions, pole dancer ambassadors
SAULO SARMIENTO LUPIT POLE AMBASSADORS
Saulo Sarmiento / Cirque du Soleil, pole and flying pole artist'I am a believer. Dreams do come true, and 'Everything happens for a reason. An artistic.. .
MARION CRAMPE LUPIT POLE AMBASSADORS
Pole Dance / Contortion Performer and Instructor, CompetitorRepresenting Awd 2016 & 2014: Positive Role model in the pole/aerial industry3rd Wolrd champ IPC.. .
ALBERTO DEL CAMPO LUPIT POLE AMBASSADORS
He's the only person to win 2 times the Pole Classic at Pole Expo, male and overall winner 2016-17, he won the first US Pole Art in 2017 and got finalist at...
PHOENIX KAZREE LUPIT POLE AMBASSADORS
She is a former gymnast and is trained in classical, contemporary and ethnic dance styles. Her dance training includes the Alvin Ailey American Dance School,...
SERGIA LOUISE ANDERSON LUPIT POLE AMBASSADORS
Hungarian artist, Péter Holoda. Péter Holoda is a dancer, actor and athlete, and he combines his versatile skills in his pole dancing routine....
CARLY CHILD LUPIT POLE AMBASSADORS
Carly Child an avid animal lover from Utah, USA is a young and very diverse pole athlete/artist/dancer. With competition titles like: 2018 USPDF.. .
MARLO FISKEN LUPIT POLE AMBASSADORS
Marlo Fisken grew up in Virginia Beach, Virginia, and has studied dance for 30 years. She is a graduate of the Virginia Governor's School for the Arts (as a...
The height tables show you
1 how to compose the pole
2 whether you need the 500 extension or not
The QUICK LOCK model has a slightly different height than the STANDARD pole, i.e. with a static allen-head spin change.
STANDARD table
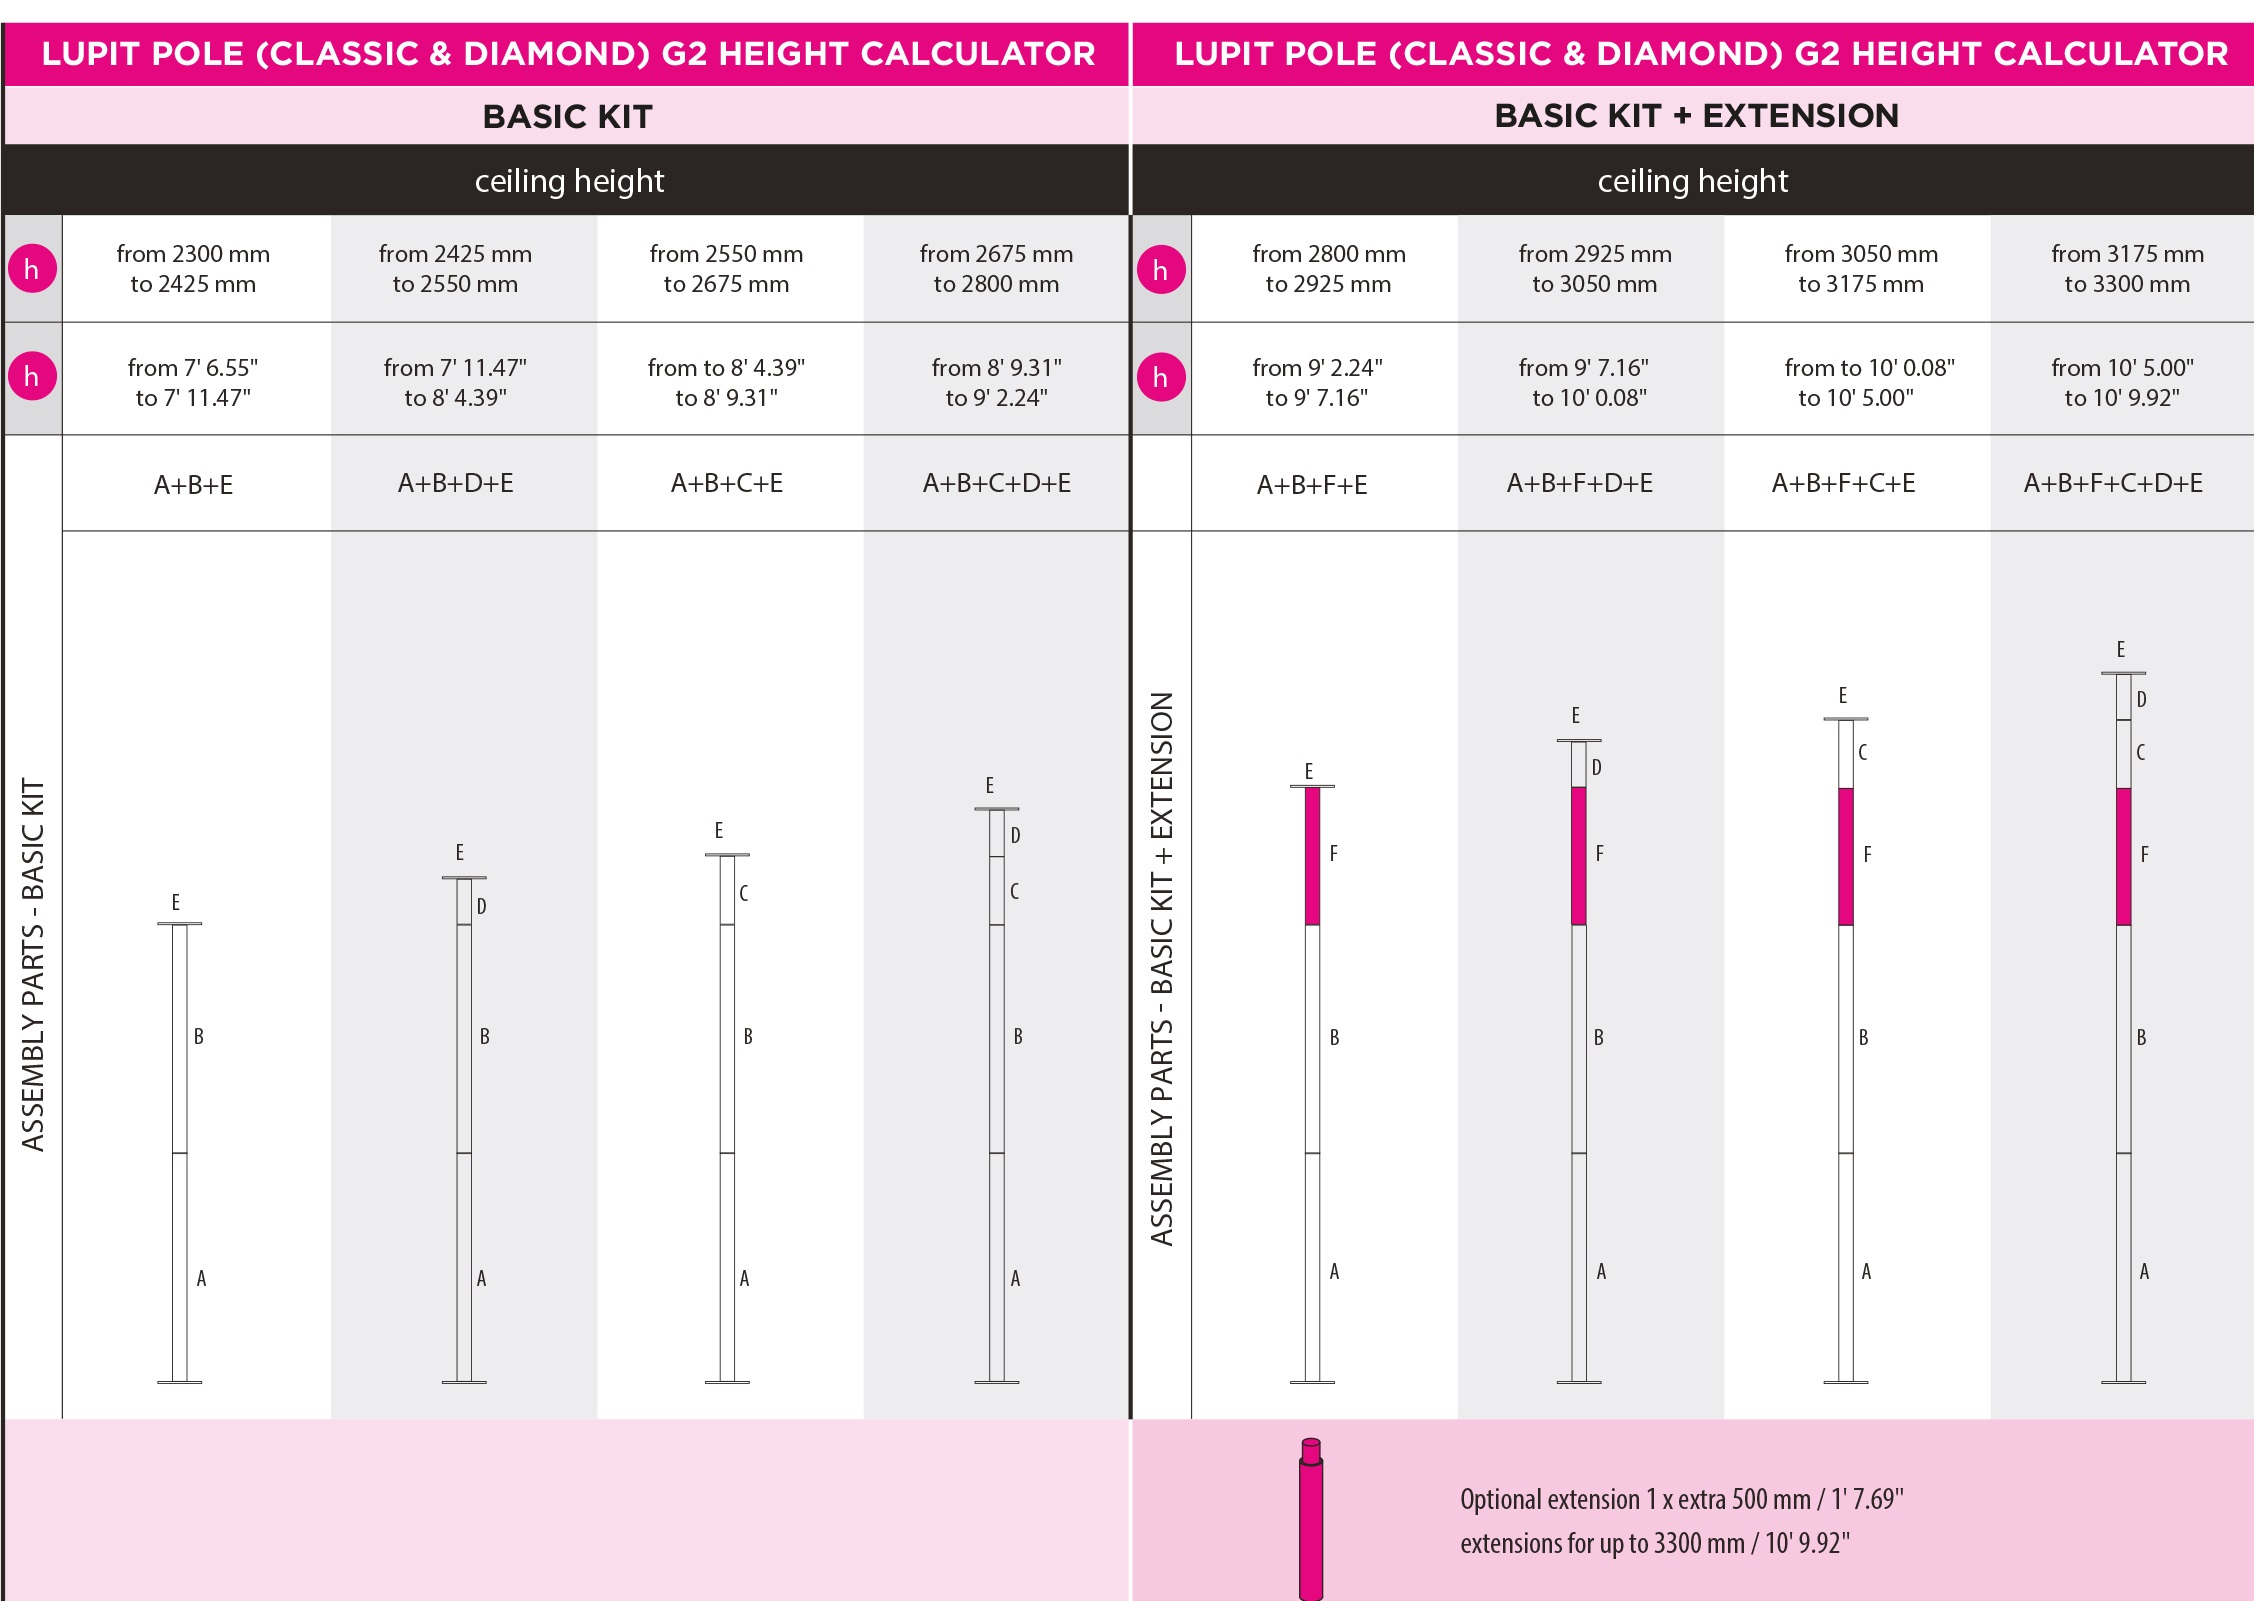
QUICK LOCK MODEL TABLE
How does it read?
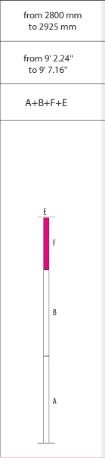 let's take the example of this figure taken from the table
indicates height from 2800 ( 2.80 metres ) to 2925 ( 2.925 metres )
By mounting the pole in the sequence of the photo, the pole extends
from a minimum height of 2.80 metres
to a maximum height of 2.925 metres.
Simple.
Measure the height of the ceiling where you will mount the pole, look at your table, and choose the range that contains your height, e.g. for the picture above a ceiling of 2.85 metres is fine.
found the range,
you look at the figure and assemble the pole with the pieces as shown.
and proceed to assemble and extend it :D simple.
Lupit Pole dance G2 guarantees
Inside the package you always receive, the detailed warranty certificate in English with stamp and signature of the test, the date that you find on the purchase receipt italiapoledanceshop, which can also be downloaded from the site and which is issued on delivery, is the beginning of the European 12-month warranty on any factory defect as indicated in the certificate in detail below
HOME fitness use :
- For 9 months against possible defects in pole, bearings, discs and workmanship.
This guarantee only applies if the product has been used e.g. for training and maintaining fitness, acrobatic or sports training at home.
Use of the g2 pole for home fitness:
The Lupit pole guarantee covers the original purchaser if the product is used for training in the home environment :
- Warranty For 12 months against possible defects in material and workmanship.
- The warranty period starts from the date of dispatch from the factory (keep the card inside the parcel showing the date and stamp of testing and dispatch then departure of validity, in a safe place just in case ).
- Once you have received the package, if you find any damage on the outside of the package,
Make a remark to the courier, affixing the reserve of control, before signing the withdrawal, proceed to check the contents and if you find an internal defect in the package, attributable to the reserve of control, immediately notify the courier who must pick up the package to return it to the sender, immediately after notifying the courier contact italiapoledanceshop. If you have found damage that can be traced back to the exterior defect for which you notified the courier of the reserve of control, you can obtain a product exchange under warranty for damage caused by the carrier .
1- Take a photo with date and time, ( also tracking with delivery time and date ) before returning the parcel, better if immediately after opening the parcel.
2- Write to info@italiapoledanceshop.it
If the contents are damaged,
once the parcel has been opened, and no damage is shown on the outside of the parcel, or to the internal parts of the protective packaging, contact us with photos and also make a remark about the type of damage found. contact Italiapoledanceshop
Damage can occur during transport for example if it rains or the courier is clumsy despite the sturdy packaging. When our goods leave our warehouse, we are not responsible. the responsibility lies with the courier.
Any damage that might instead be caused by the manufacturer (no defects in the packaging, or cracks in the outer and inner cartons...) should be reported immediately to info@italiapoledanceshop.it who will check and replace the part.
- In case of a warranty claim, please contact us or the specialist
retailer at your point of purchase italiapoledanceshop
- The provision of warranty service is limited to the country where your equipment
was purchased. ( italy : italiapoledanceshop )
Are excluded from the warranty
- Parts of orange rubber parts of the lower and upper disc,
- Damages caused by improper use of the product, ( carry out maintenance and follow the instructions of the shop, also asking the assistance how to do it )
- Damages caused by the modification of the product without consent
- Defects caused by abuse, ( example use in a studio environment for teaching instead of home fitness training )
- Defects caused by insufficient maintenance,
- Defects caused by third-party failure (assembly error, misuse, incorrect use of the pole with incorrect assembly/positioning),
- Defects caused by improper storage outside the home, e.g. in a garage.
In the event of a warranty claim:
- Subsequent damage, for not reporting defects as soon as the parcel arrives
Complaints and other problems should be sent to your specialist dealer immediately after discovery or upon receipt of the parcel.
- The purchase receipt and the correct serial number are required when making any warranty claims.
Are holes or no holes better?
certainly without holes is better as the high-tech Lupit Pole G2 poles are designed to be secure with fastening without holes.
Modular pressure poles (which do not exist in Italy, pressure poles do, but modular poles do not) are designed to be safe and stable without invasive fixing to the ceiling, and are made by the largest pole and aeiral dance equipment manufacturer in Europe.
Bespoke poles are also press-fit like all poles, but are one-piece or 2-piece and a limited 5cm excursion, they are designed and IPSF certified for pole dance school courses.
The Lupit G2 multi height pressure poles like the Xpert Xpoles, are the only adjustable and safe poles without holes in the ceiling and we proudly distribute them to spread the correct culture of sports training on specific modular poles that allow you to train ANYWHERE on your own.
A sports culture that in Italy has been quite polluted by the massive presence of advertising made in Italy brands that arrived decades after the birth of the sport pole dancing in the world.
Inany case, pressure poles are made for everyone and without having to drill anything,
safe for children, safe for adults. All you have to do is follow the correct assembly instructions and know how to use tools such as an Allen key.
Italiapoledanceshop with Lupit has thought that if you feel the need to add holes to the top plate
even if only for psychological safety, which would not be strange given the current media conditioning,
you can do so, even with a simple drill on your own,
or by requesting the pole with the holes already drilled by the factory. ( they do not imply any loss of warranty, and the pole is always removable from its seat fixed to the ceiling )
follow these rules if you wish to fix the top disc to the ceiling :
* the pole is made to work well without anchors
1 : FIXING, take the measurements directly with the perforated disc against the wall, marking the points with a pencil. Drill a hole in the ceiling wall and insert long fischer clips, possibly with two-component glue, which will cement the fixing to the ceiling. ( after the hole, fill with the cementing component, insert the fischers inside, lay the disc, and insert the screws into the holes, screw them in to expand the fischers all the way down hold against the ceiling just enough for the two-component to take )
This will give the support maximum stability.
2 : Pole unhooking: the pole is made to lower and extend, attached to the plate you have fixed to the ceiling, the small cylinder remains attached to it, without the pole, which you will remove in full. when not in use.
This means that to remove the pole, with the plate attached to the ceiling, you must
put the pole in static, unlocking the internal disc which brakes the up and down movement of the pole,
by opening the template at the bottom,
the locking system, i.e. the internal disc, must be unscrewed by means of the 4 screws holding it to the pole,
once this is done, the pole is free to lengthen and shorten by turning it on itself...
Now, to lower it a few cm just enough to remove it from the ceiling attachment and then remove it, you will have to rotate the pole in a counter-clockwise direction, which has an effect on the screws holding the top plate! To ensure that the top plate and screws are not affected by the rotational movement impressed
lower the pole, holding the top plate at the top
while performing the operation . This is the way to ensure that the screws holding the top plate do not suffer in the long run from the daily dismantling of the pole.
But it is a scruple, you can just as well skip this whole step and lower the pole as remove it from its position.
It is perhaps easier for 2 people to carry out this procedure, x removing the pole by pressure in this way,
but it guarantees the durability of the top plate fixing,
an extra security to safeguard holes in the wall and screws.
Since this pole is designed to be used with PRESSURE WITHOUT DRILLING THE CEILING,
use with additional holes must be adjusted accordingly.
Thank you for your attention
VIDEO MOUNTINGPole assembly video
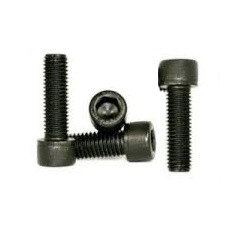
How are hexagon socket spanners used? For any use.

Screws of this type were invented and then perfected in 1945.
They are characterised by being
- simple to use
- economical;
- The lever system allows a high torque to be applied;
- the spanner is prevented from slipping out of the screw and risking damage to surfaces;
- Only one spanner is needed to insert the Allen screw.
The advantages are many, but it is important when you have a piece of equipment, an appliance, a motor part, that has Allen screws, to know how to unscrew them in the correct way, to avoid 'beginner' mistakes such as stripping the recess.
Tricks for stripping the screws of any tool
There are many methods for unscrewing a screw whose hexagonal recess has been stripped.
Lupit Pole screws, for example, are THUMBLINED on the cylindrical outer part. This allows you to grasp the cylindrical outer part of the screw with a small pair of pliers and unscrew it by tightening it firmly and turning anti-clockwise. After that it is unscrewed.
Another trick if you have left a screw tightened for a long time and it has oxidised,
heat the screw with a hair dryer or special heating tool, the rise in temperature will enlarge the screw inside the threaded seat, this will facilitate the disintegration of any oxidation, allowing you to unscrew the screw (wait until it has cooled down).
Or in combination there are spray foam products, (Finish line - Chill Zone) which cool to -40 degrees Celsius. These are spray cans with a cannula like the w40 lubricant, first heat the screw, and then immediately afterwards, with the cannula positioned at the entrance of the screw in the hole, spray the product, which will penetrate inside, and thanks to the thermal shock the oxidation will crumble, allowing you to unscrew the screw blocked.
If you need assistance please write to info@italiapoledanceshop.it